
Save the citizens of Rivershire from a terrible plague!
Whether you use this document as a reference when things get difficult or as a road map to get you from beginning to end, we’re pretty sure you’ll find what you’re looking for here.
This document contains a complete Enchanted Kingdom: Fog of Rivershire game walkthrough featuring annotated screenshots from actual gameplay!
https://www.bigfishgames.com/blog/walkthrough/enchanted-kingdom-fog-of-rivershire-strategy-guide-hints-cheats-codes-tips-tricks/
Welcome to the Enchanted Kingdom: Fog of Rivershire Walkthrough.
Save the citizens of Rivershire from a terrible plague!
Whether you use this document as a reference when things get difficult or as a road map to get you from beginning to end, we’re pretty sure you’ll find what you’re looking for here.
This document contains a complete Enchanted Kingdom: Fog of Rivershire game walkthrough featuring annotated screenshots from actual gameplay!
We hope you find this information useful as you play your way through the game. Use the walkthrough menu below to quickly jump to whatever stage of the game you need help with.
Remember to visit the Big Fish Games Forums if you find you need more help. Have fun!
This walkthrough was created by Nina de Boo, and is protected under US Copyright laws. Any unauthorized use, including re-publication in whole or in part, without permission, is strictly prohibited.
Walkthrough Menu
- General Tips
- Chapter 1: The Healer of Rivershire
- Chapter 2: The Infection Source
- Chapter 3: Littlespring Village
- Chapter 4: The Island
- Chapter 5: The Heart of the Demon
General Tips
- This is the official guide for Enchanted Kingdom: Fog of Rivershire.
- This guide won’t tell you when to zoom into a location; the screenshots show each zoom scene.
- Hidden-object puzzles are referred to as HOPs. Only the locations of the HOPs will be shown.
- Use the map to fast travel to a location.
Chapter 1: The Healer of Rivershire
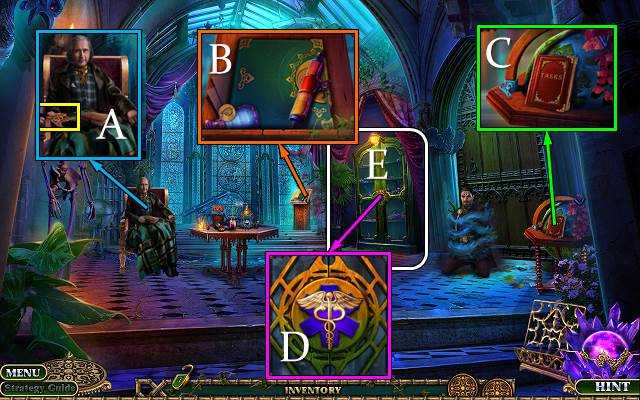
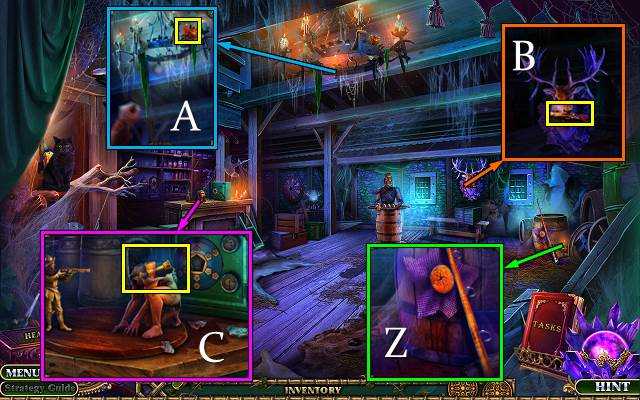
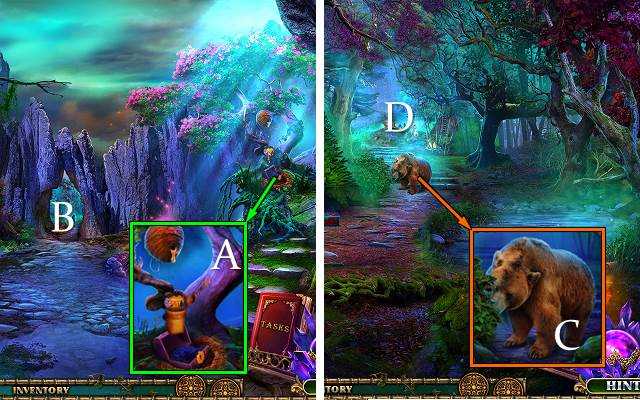
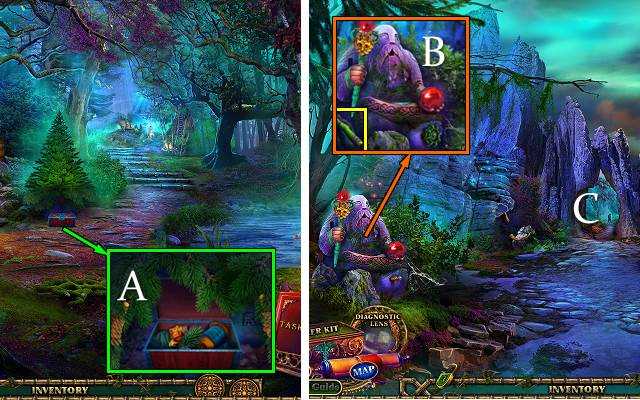
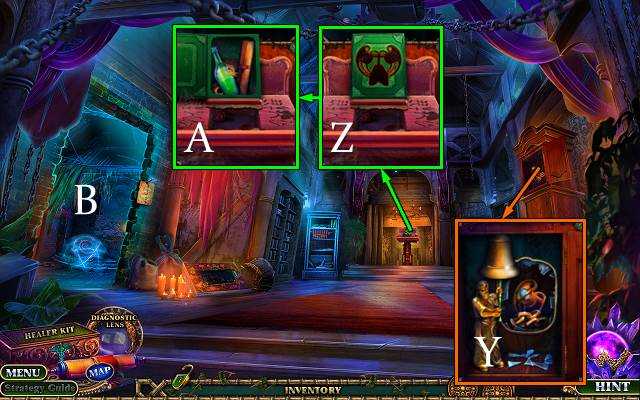
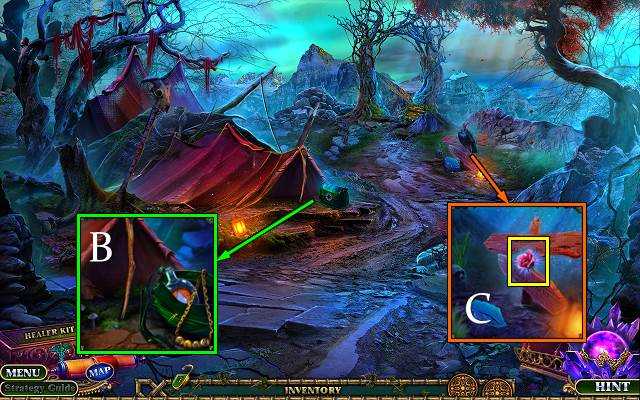
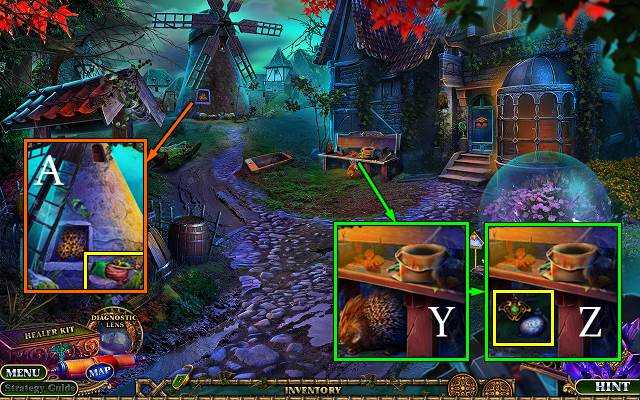
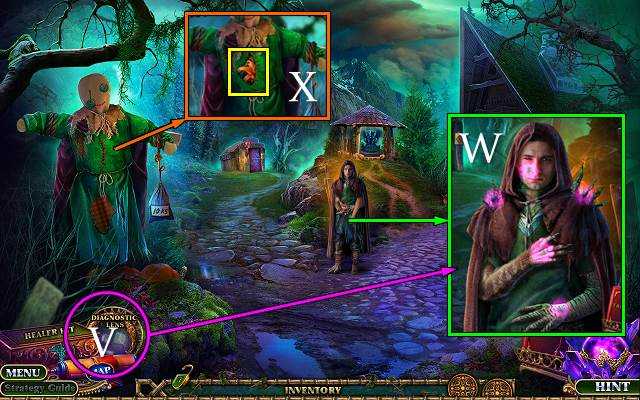
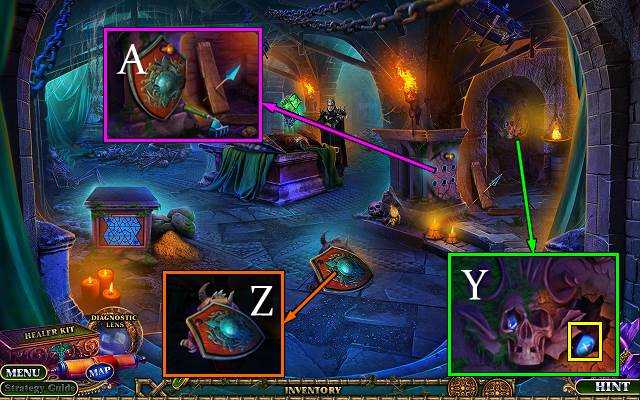
- Talk; take CADUCEUS (A).
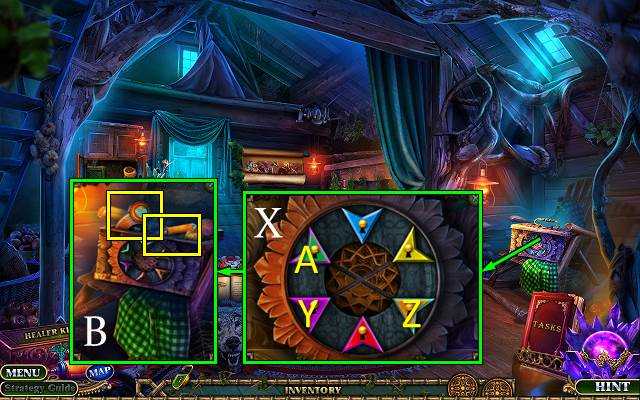
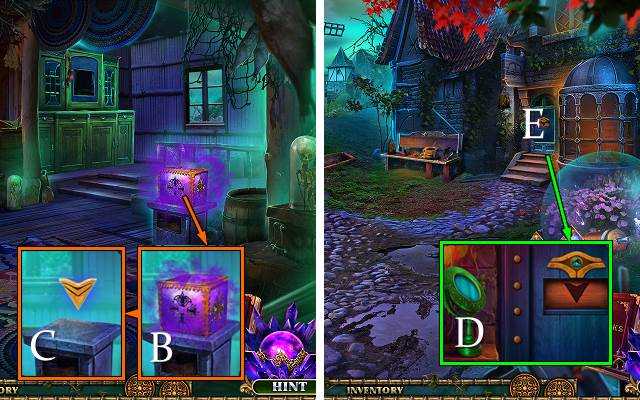
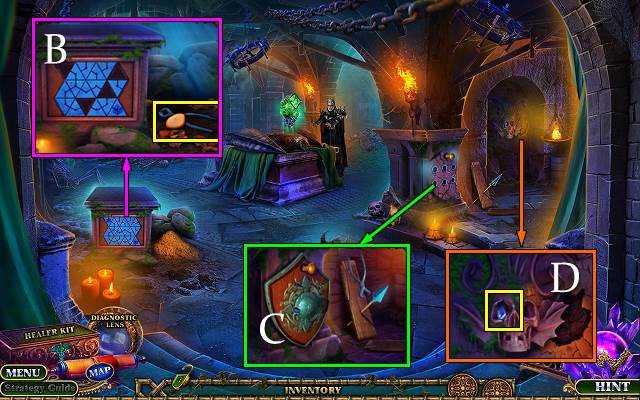
- Take map and BOTTLE OF WATER (B).
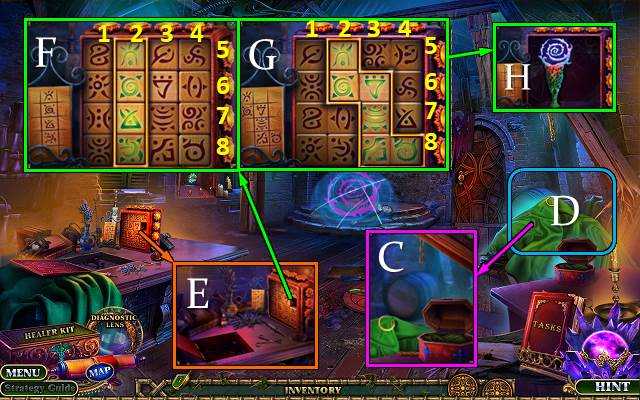
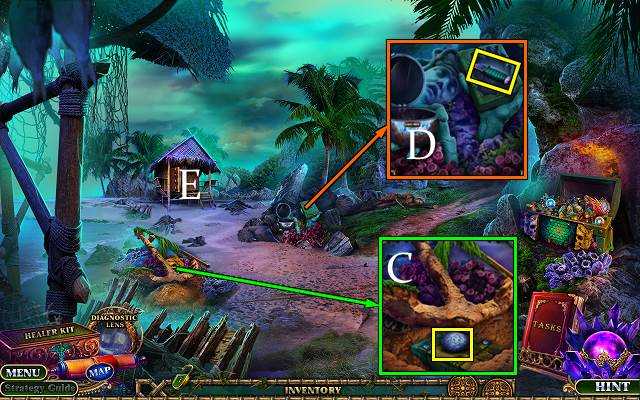
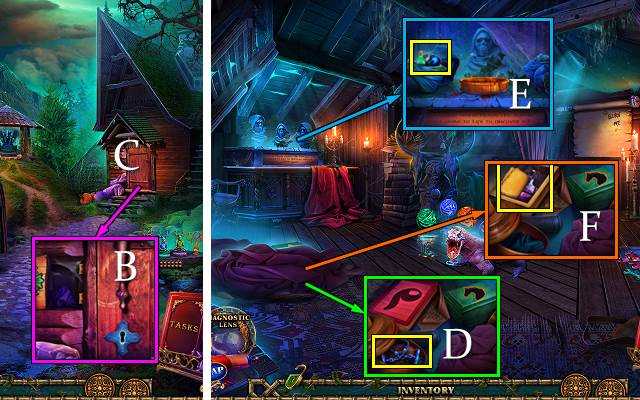
- Take taskbook (C).
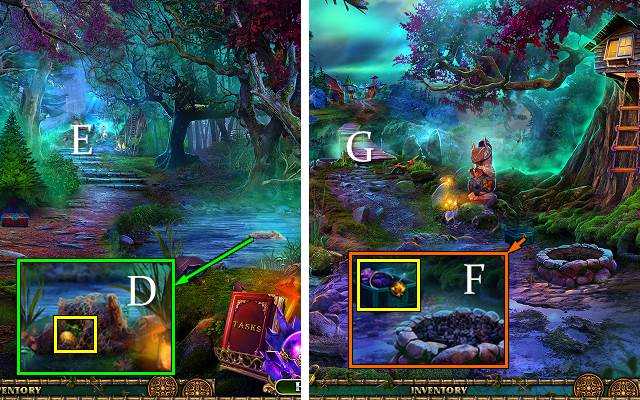
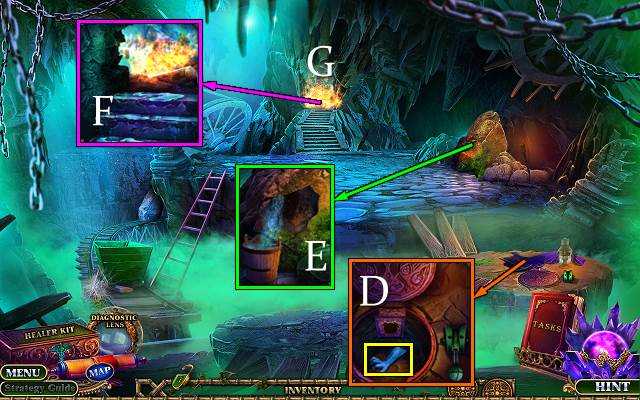
- Place CADUCEUS (D).
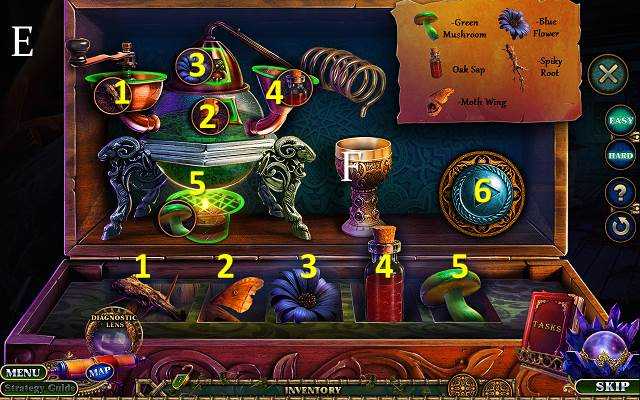
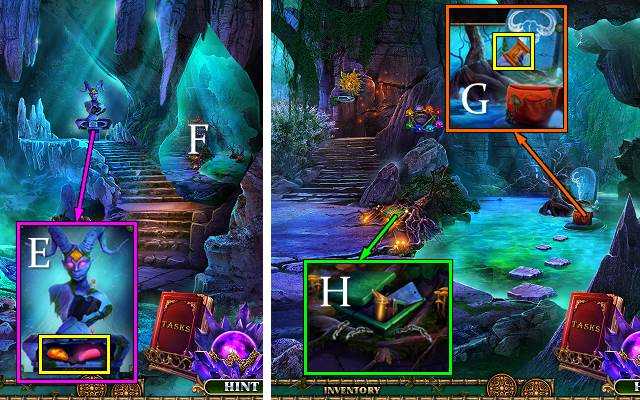
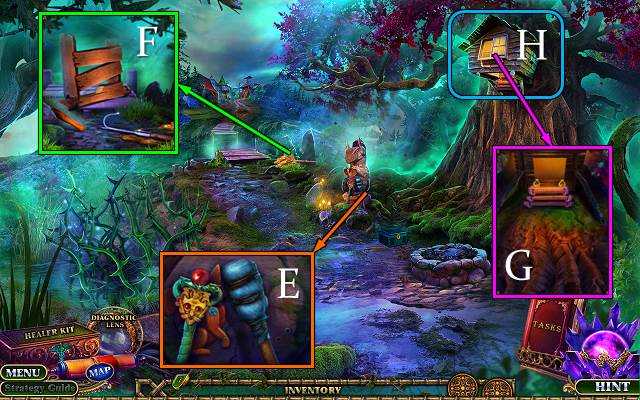
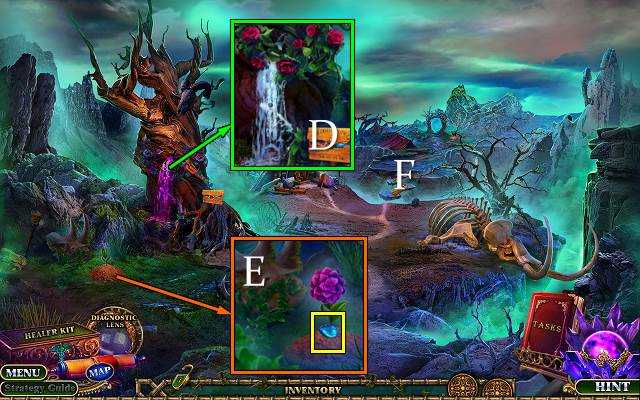
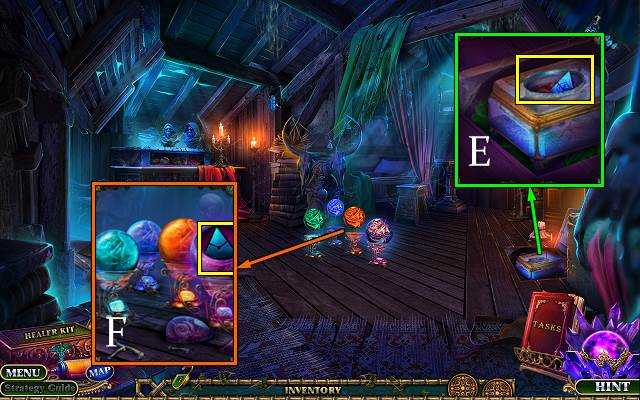
- Play HOP (E); receive HEALER KIT.

- Take note and Diagnostic Lens from HEALER KIT.
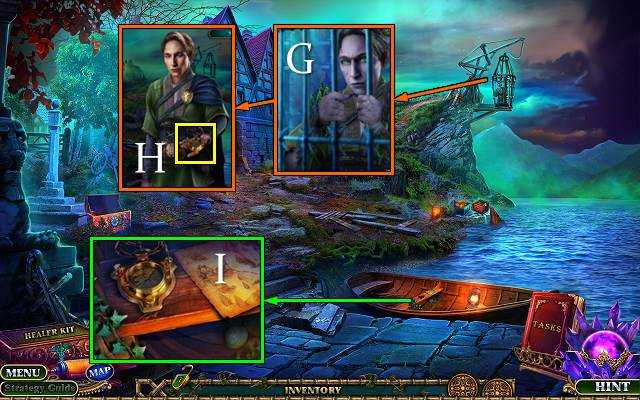
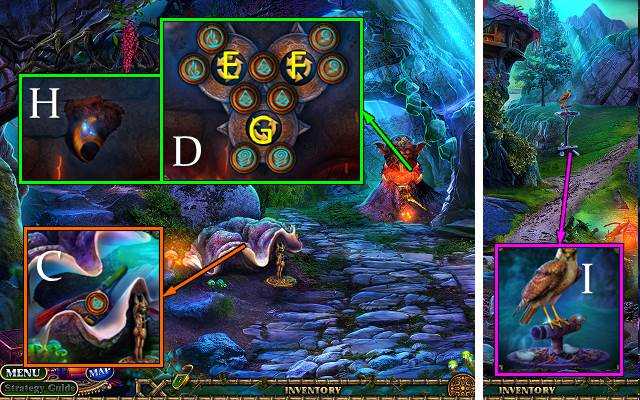
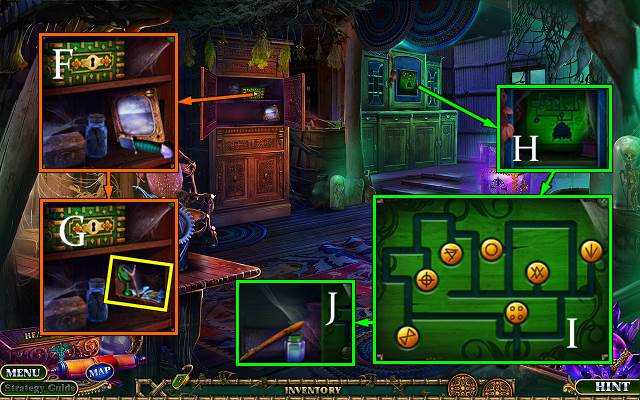
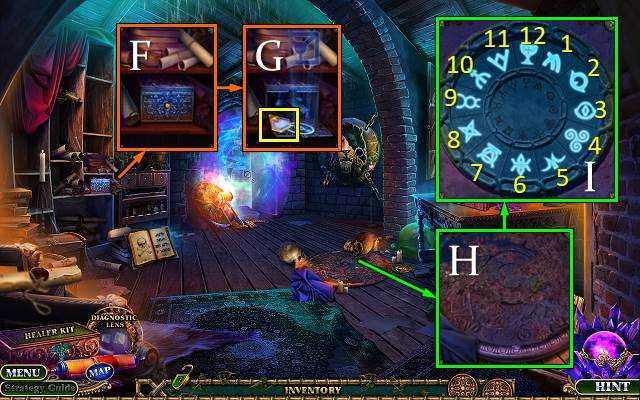
- Use Diagnostic Lens (F); examine patient (G).
- Receive INGREDIENT LIST.
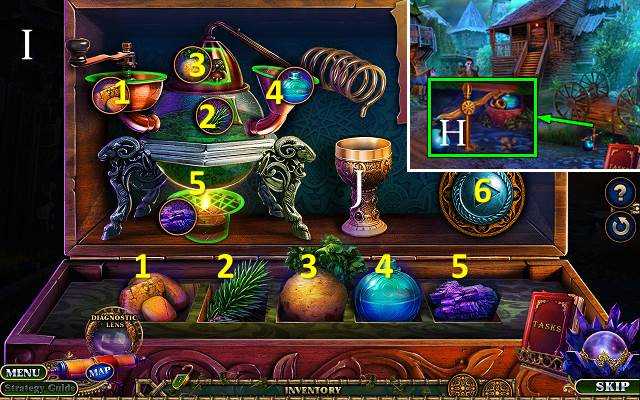
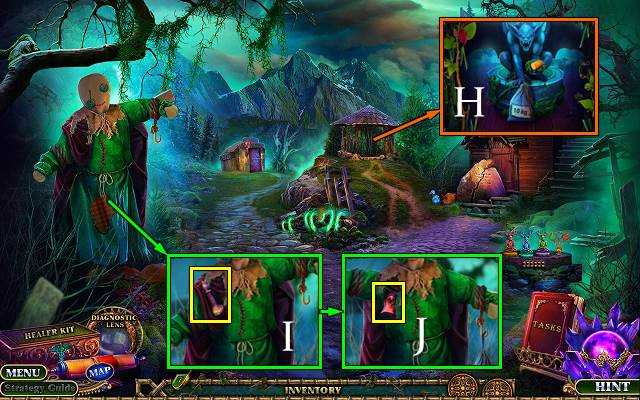
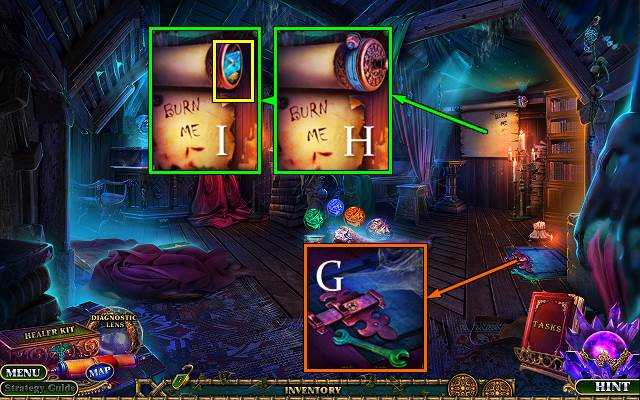
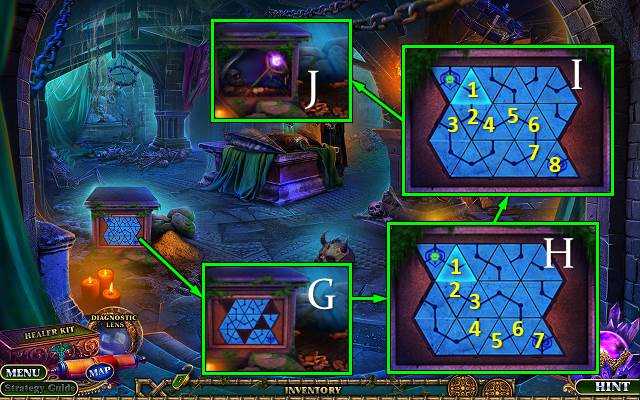
- Take RING (H).
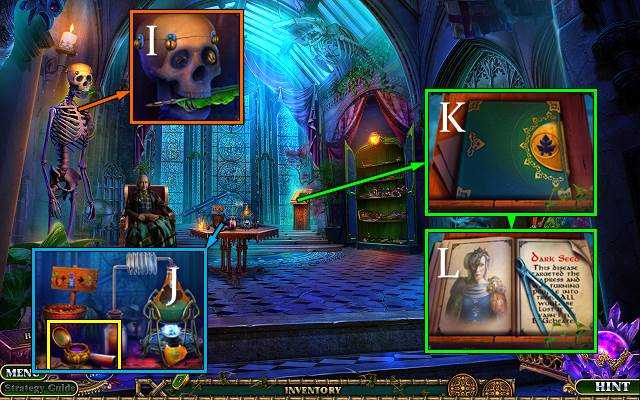
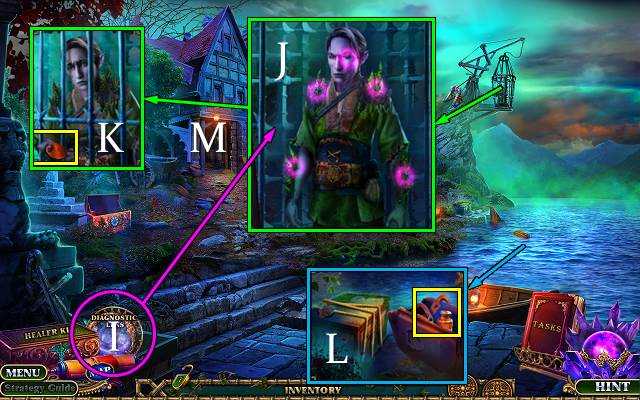
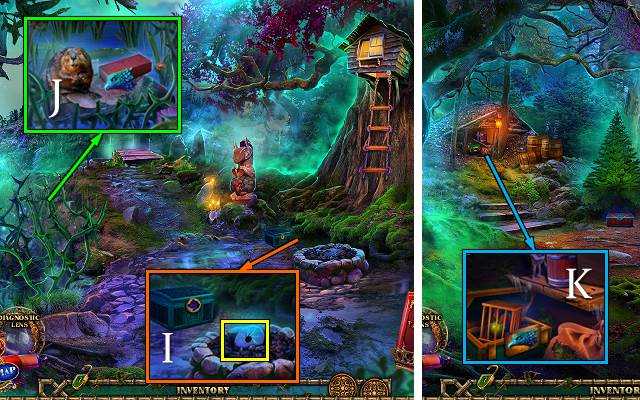
- Take QUILL (I).
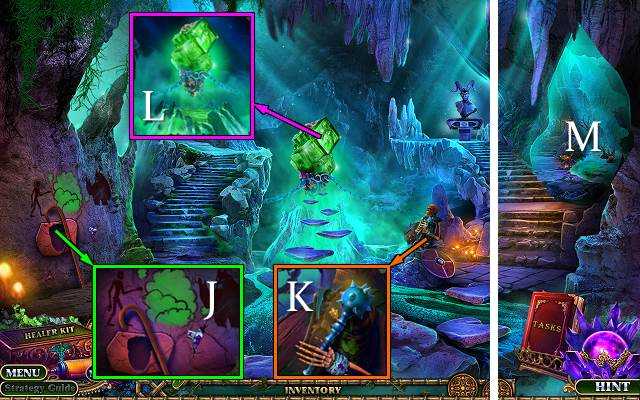
- Take INKWELL and note (J).
- QUILL on INKWELL; receive INKED QUILL.
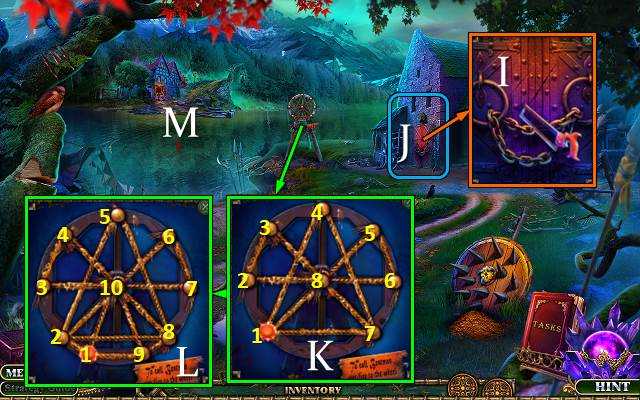
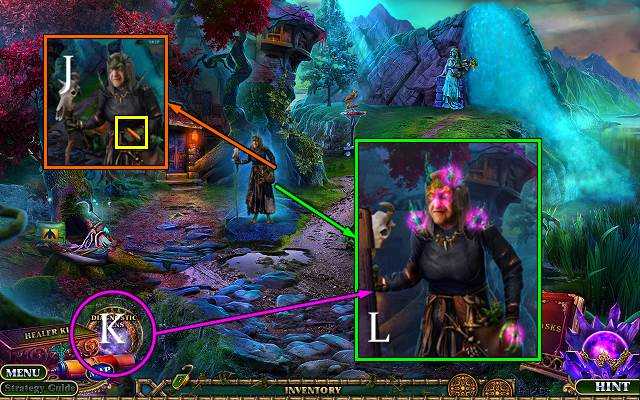
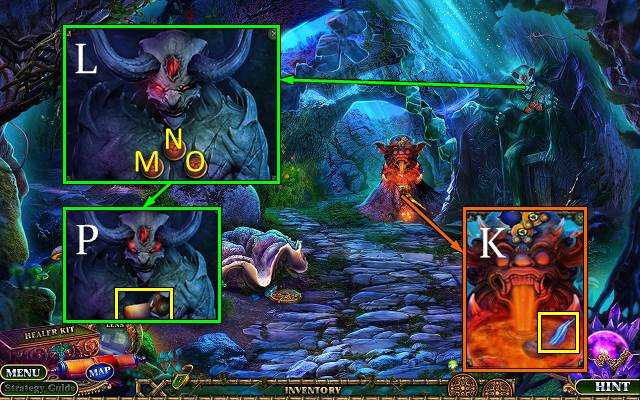
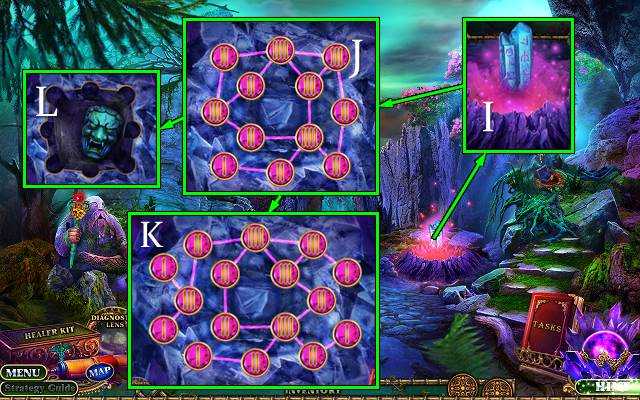
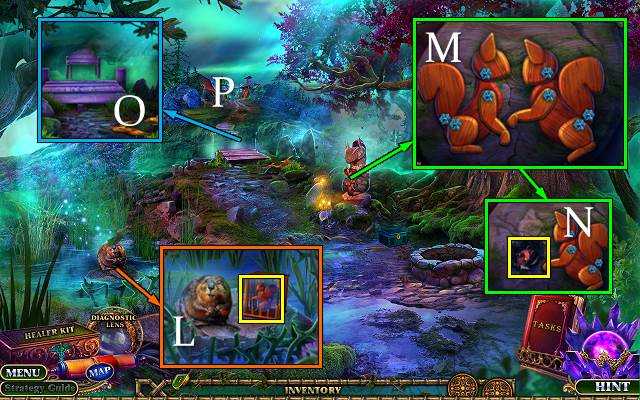
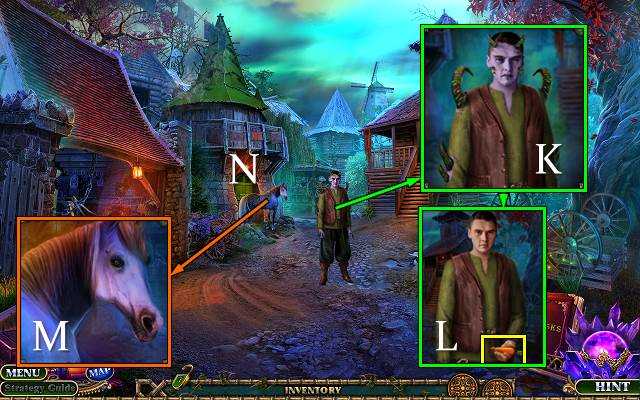
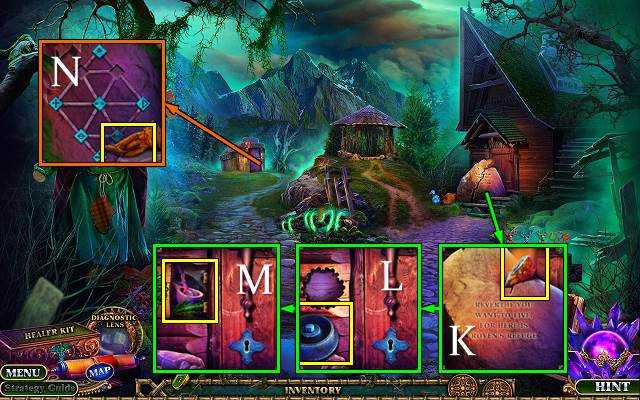
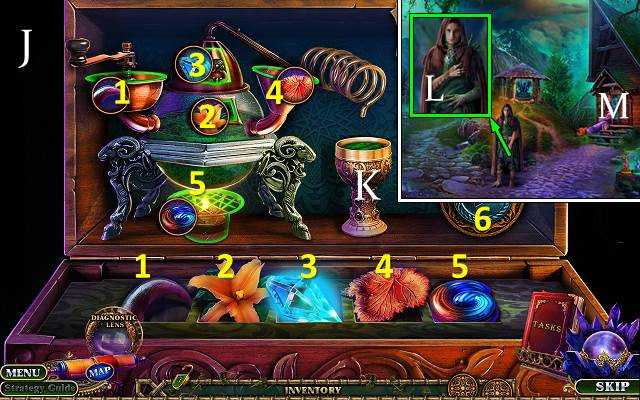
- Use RING (K). Take PLIERS, turn page, take POTIENT INGREDIENT 1/5, turn page and use INKED QUILL. Take POTION INGREDIENT 2/5 (L).
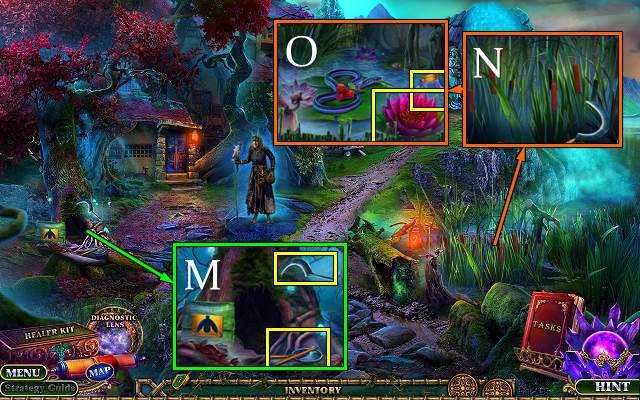
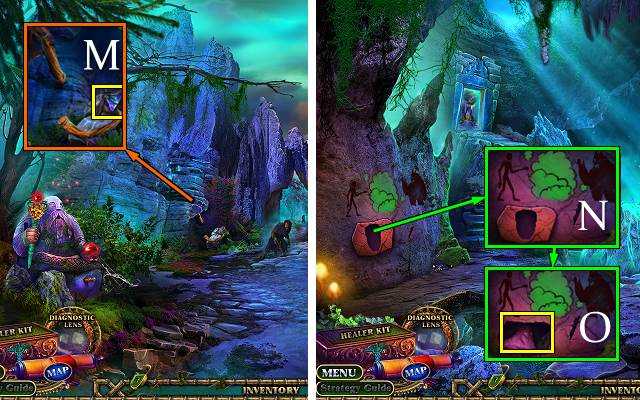
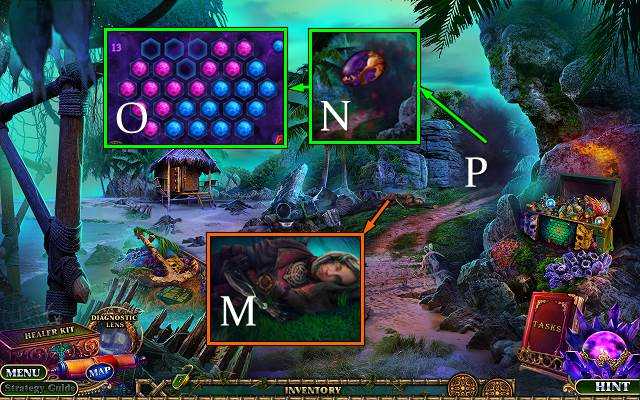
- Break key. Use PLIERS; take GLUE, SEED and SCREWDRIVER (M).
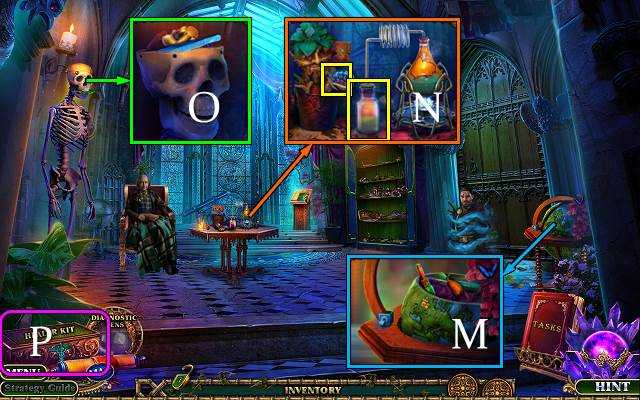
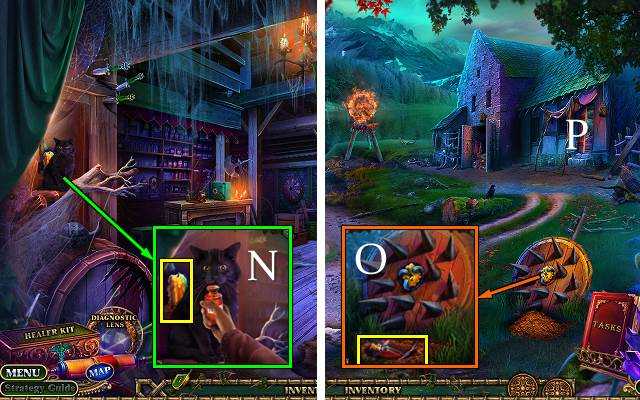
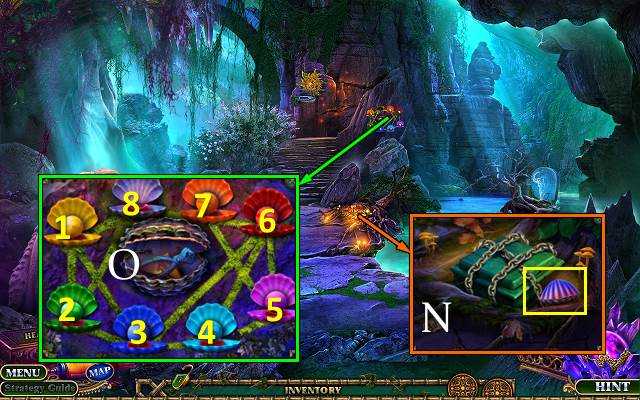
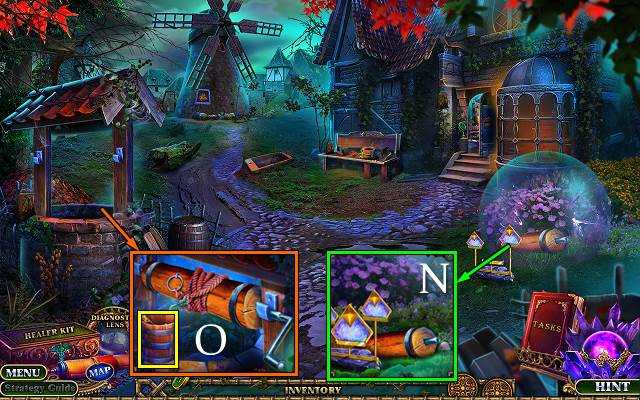
- Use GLUE; place glass. Place SEED and use BOTTLE OF WATER; take POTION INGREDIENT 3-4/5 (N).
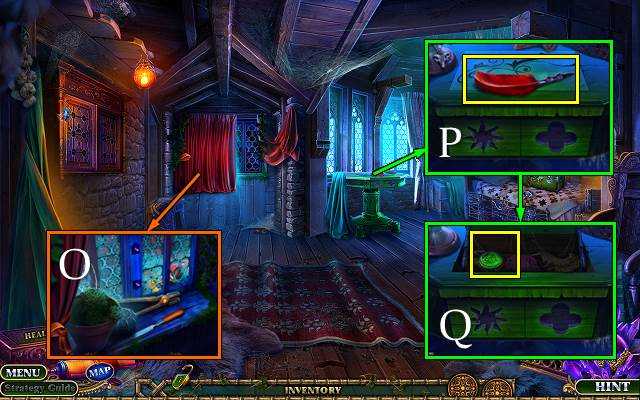
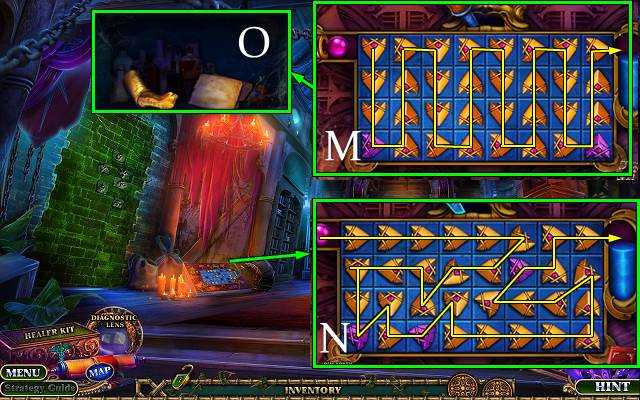
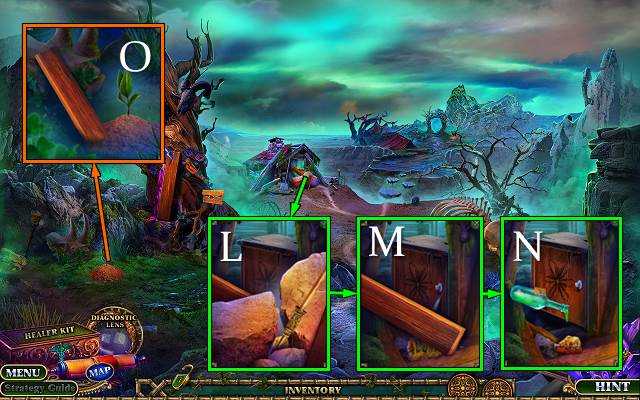
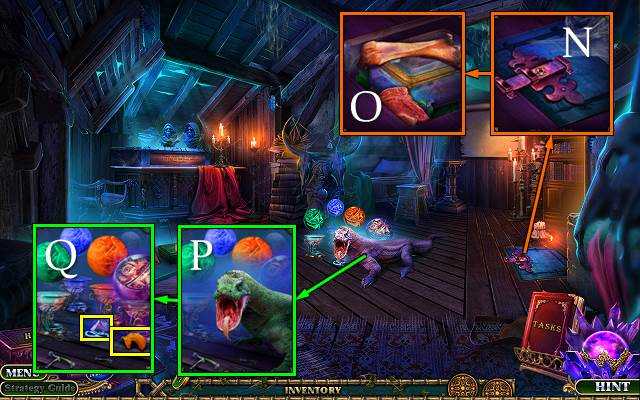
- Use SCREWDRIVER; take TWEEZERS, THIN METAL ROD and POTION INGREDIENT 5/5 (O).
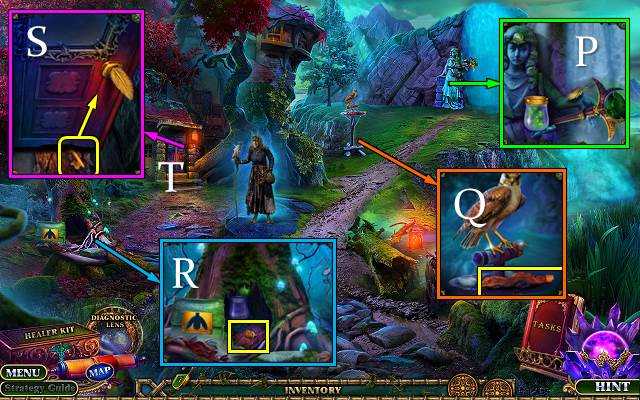
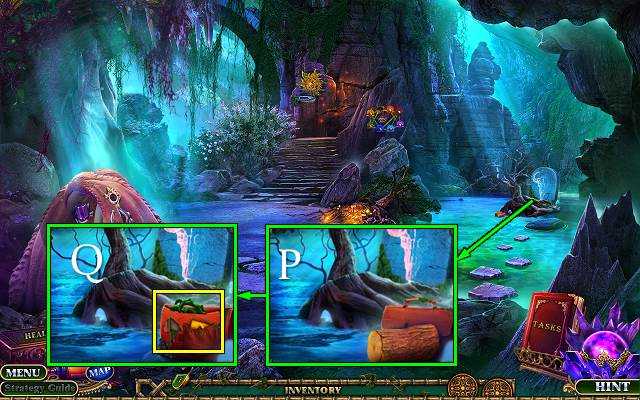
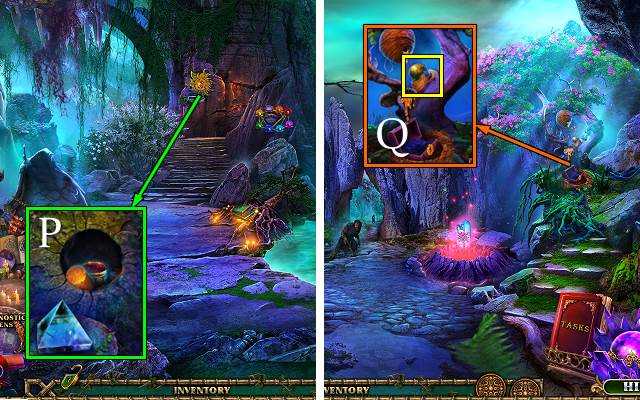
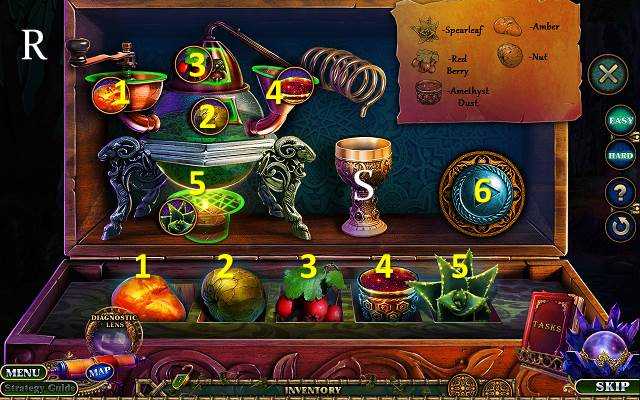
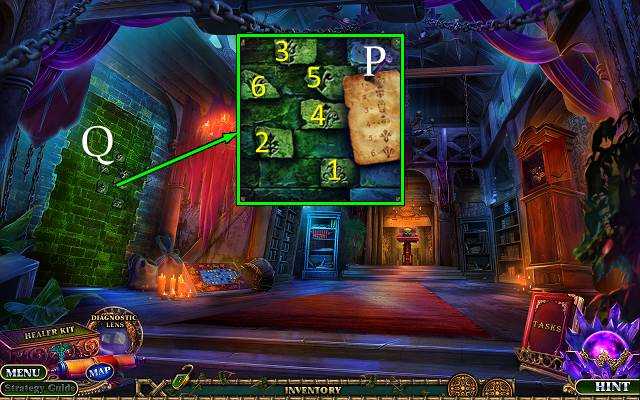
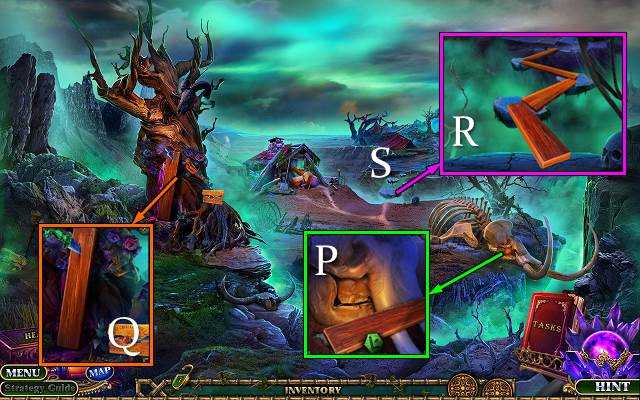
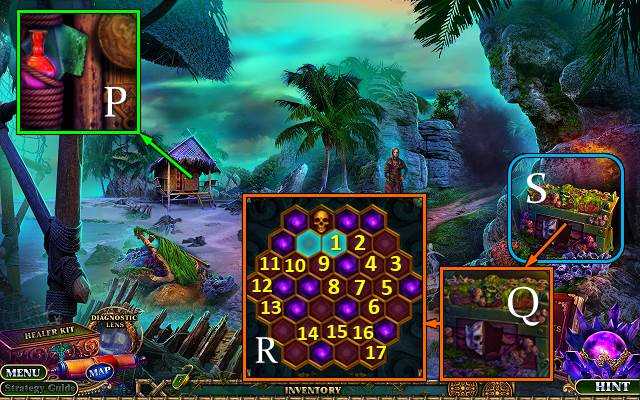
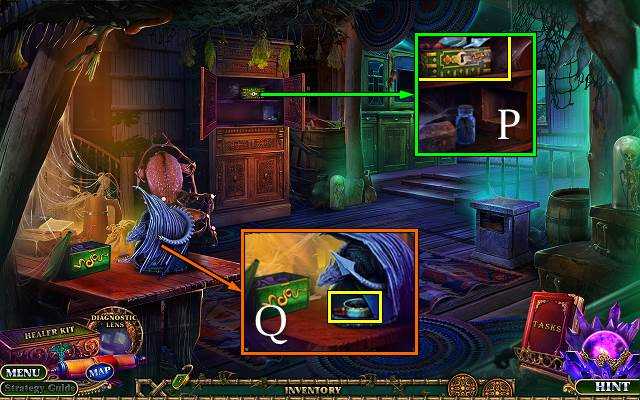
- Access Healer Kit (P).
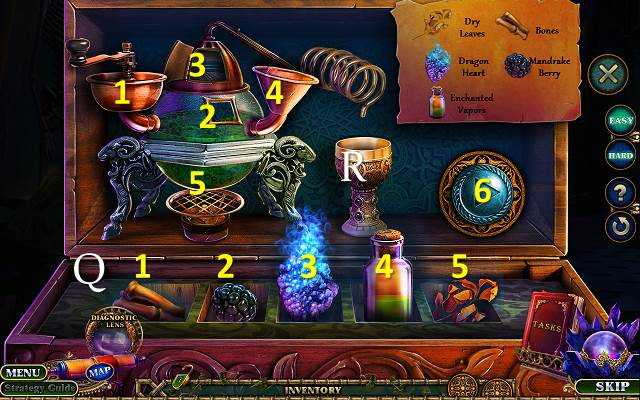
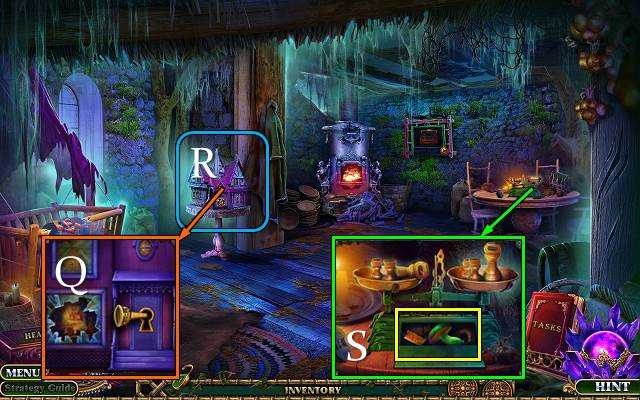
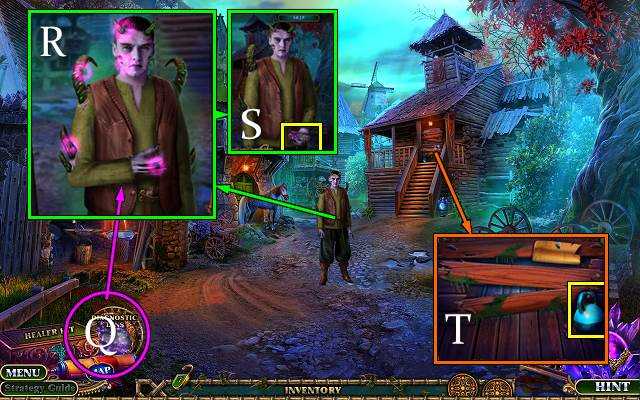
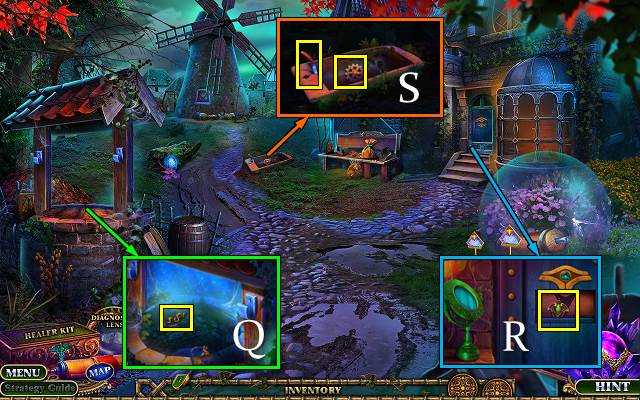
- Place POTION INGREDIENT; solution (Q).
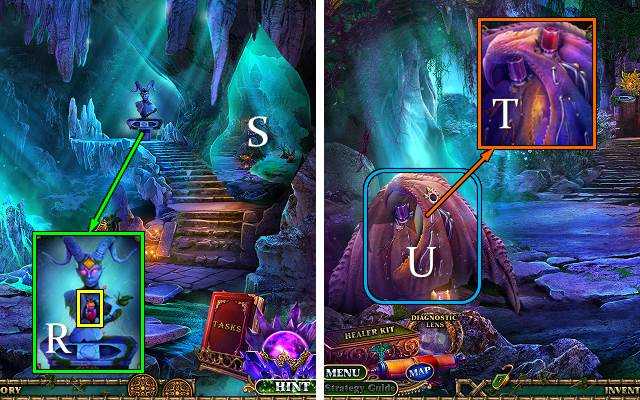
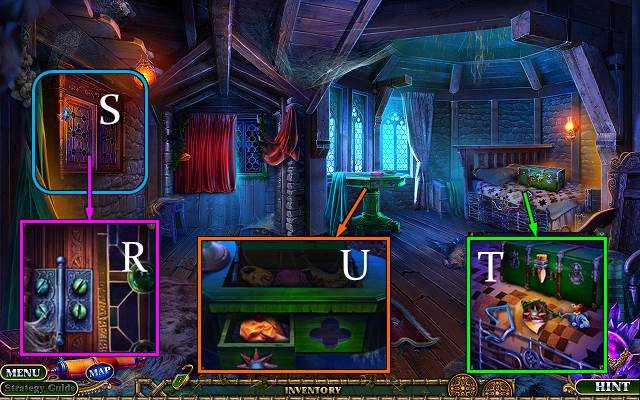
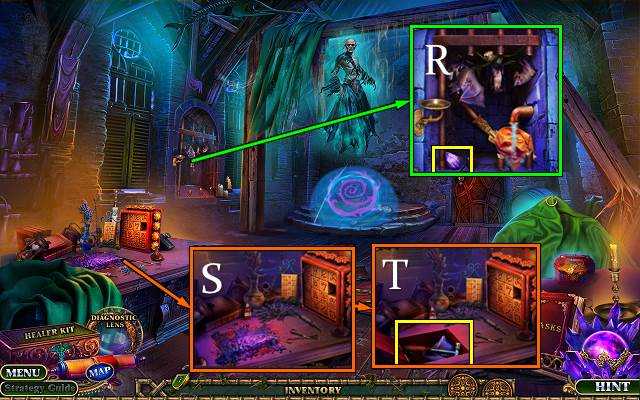
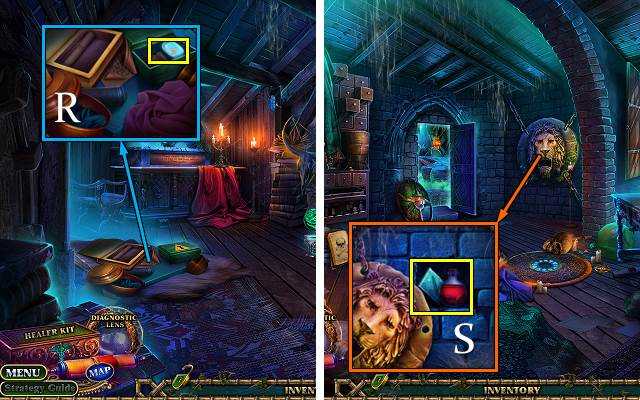
- Take HEALING POTION (R).
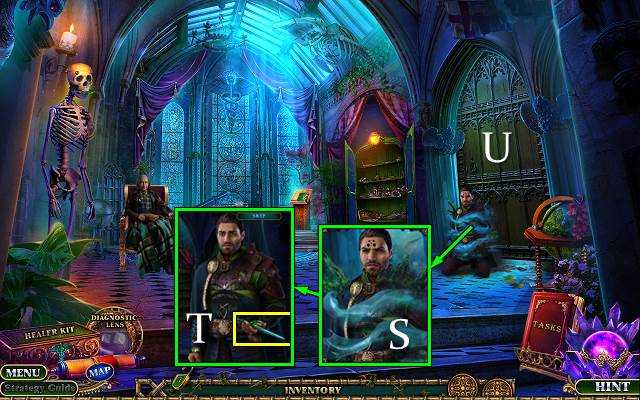
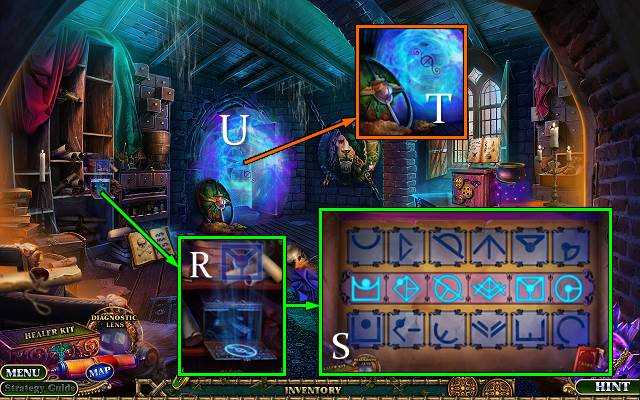
- Offer HEALING POTION (S).
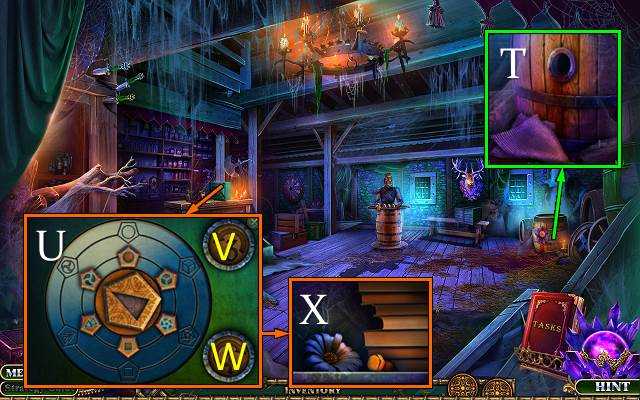
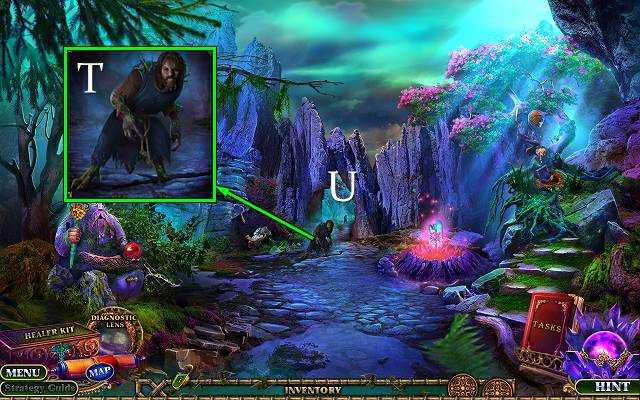
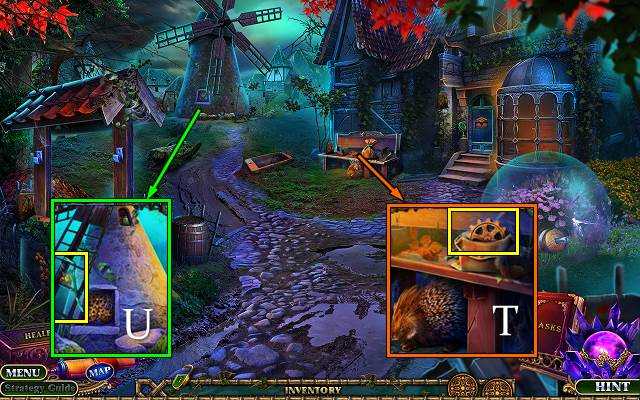
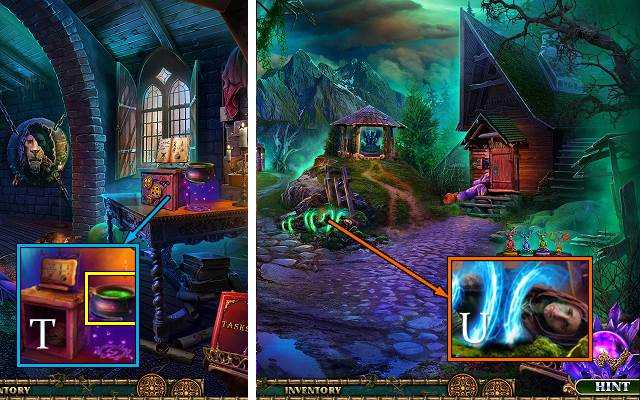
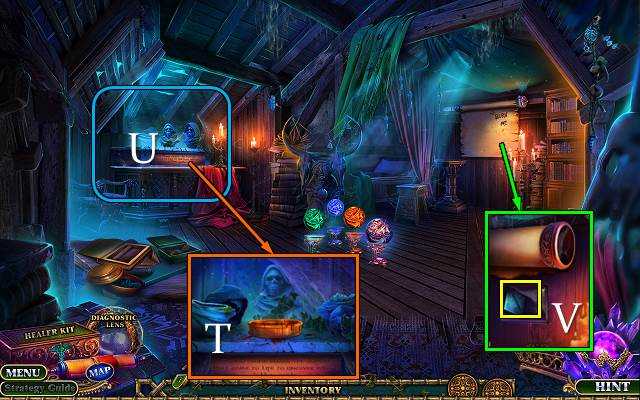
- Take DAGGER (T).
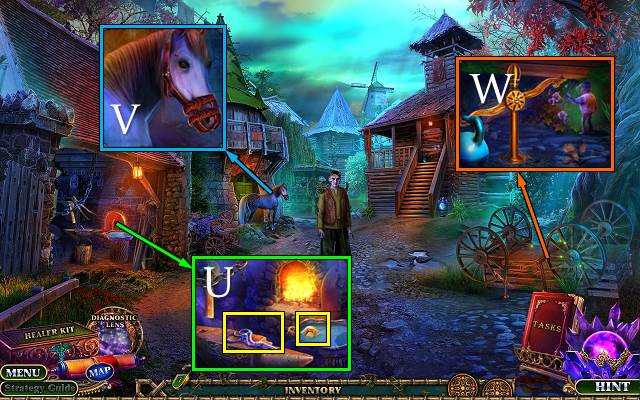
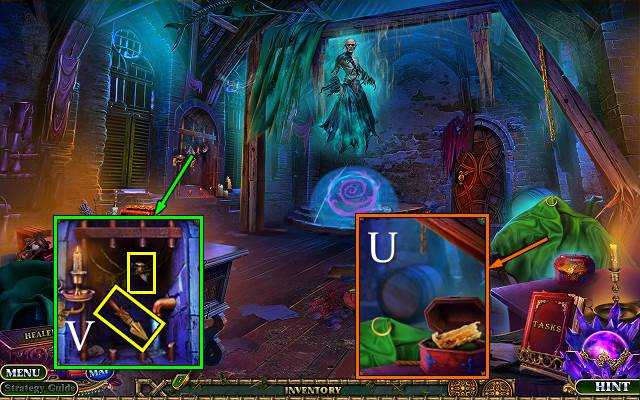
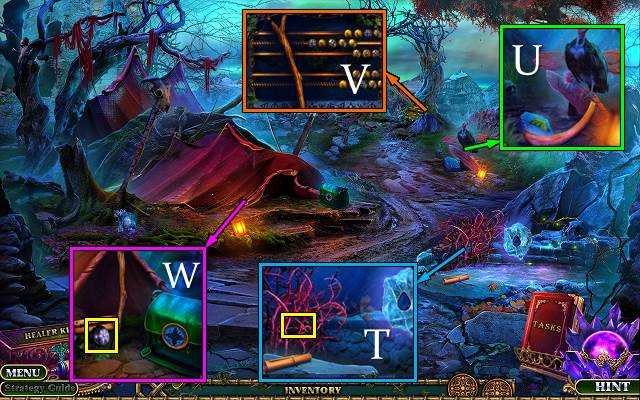
- Go (U).
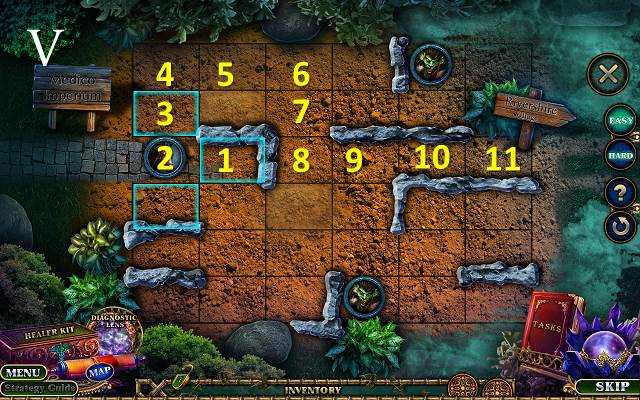
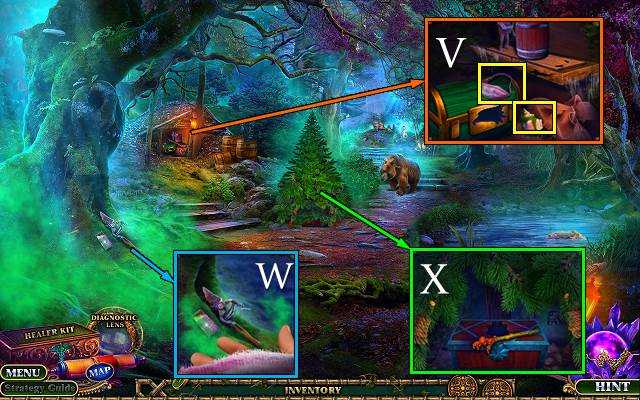
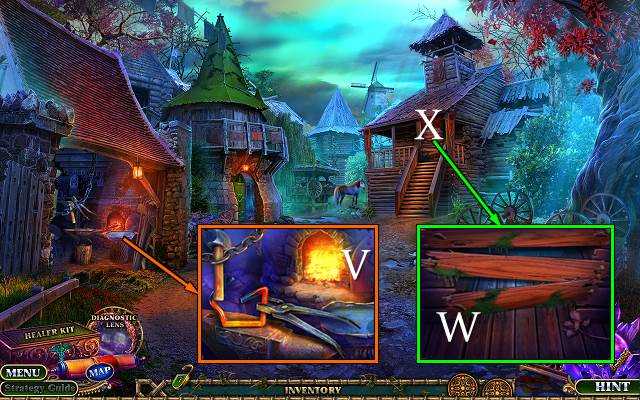
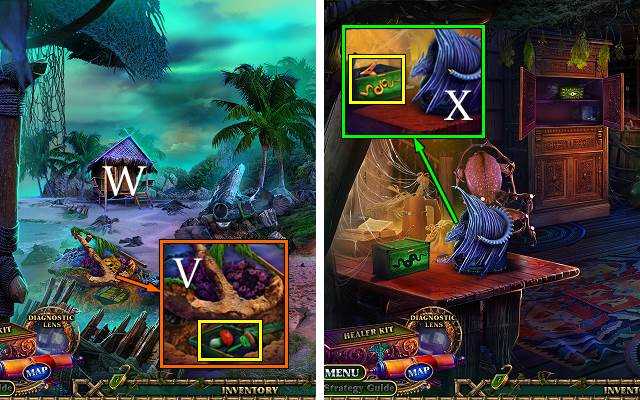
- Easy and hard solution (V): select 1-11.
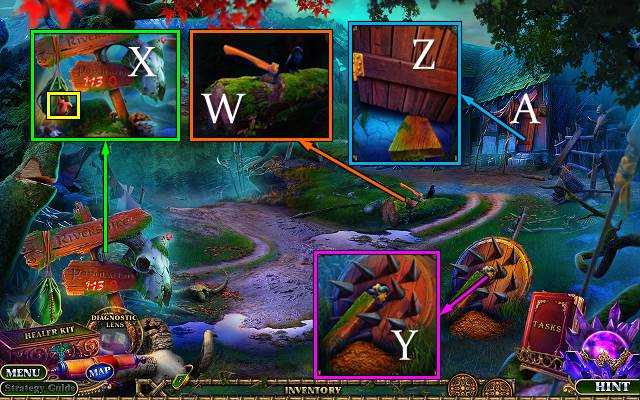
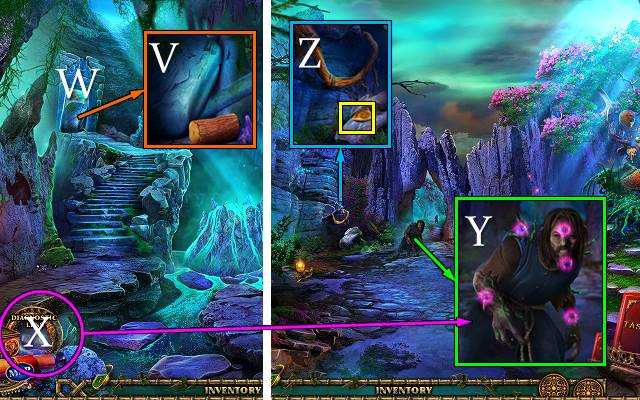
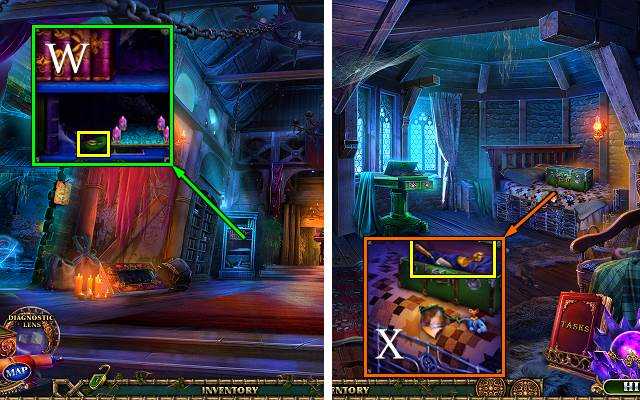
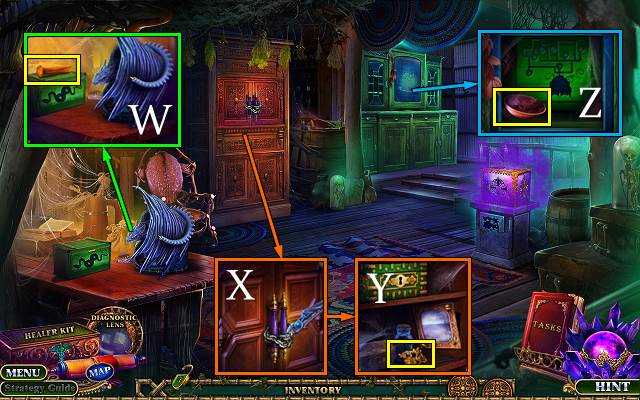
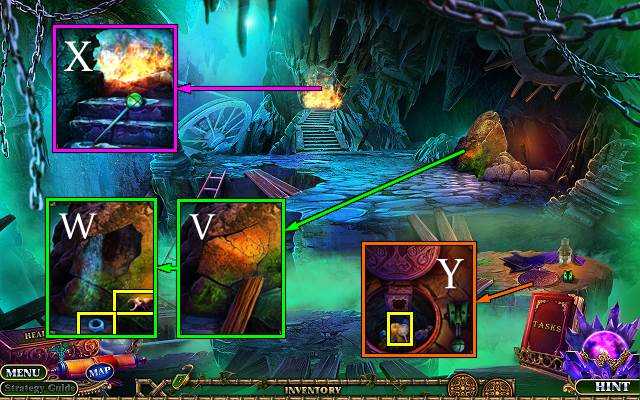
- Take RUSTY AXE (W).
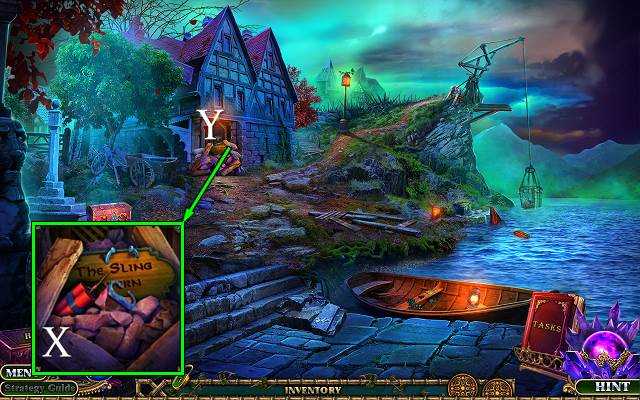
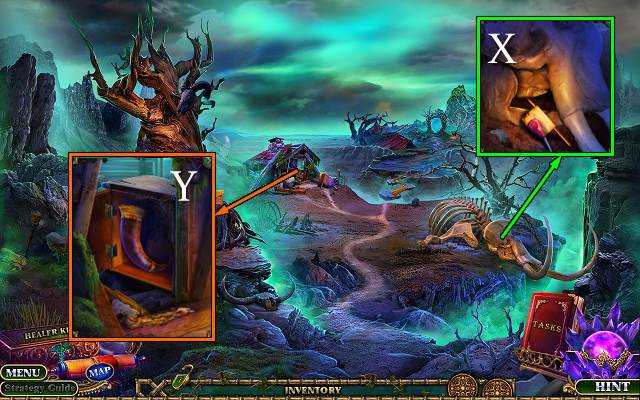
- Use DAGGER; take BROKEN HACKSAW and LEMON (X).
- Take OLD BOARD (Y).
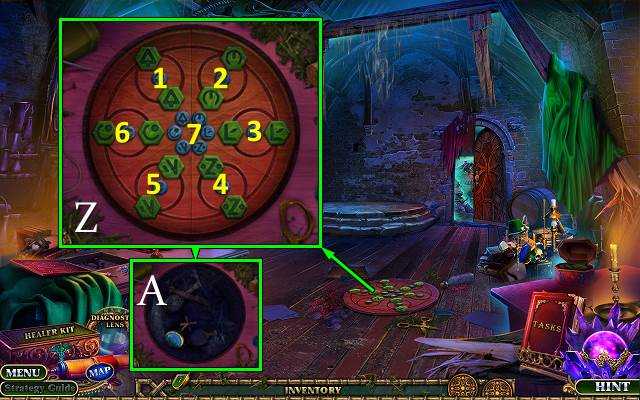
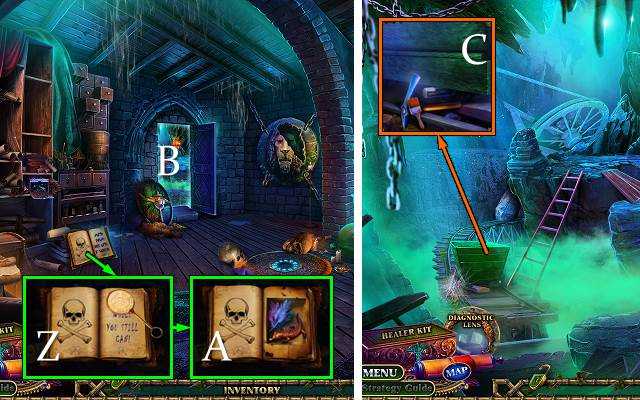
- Place OLD BOARD and THIN METAL ROD (Z).
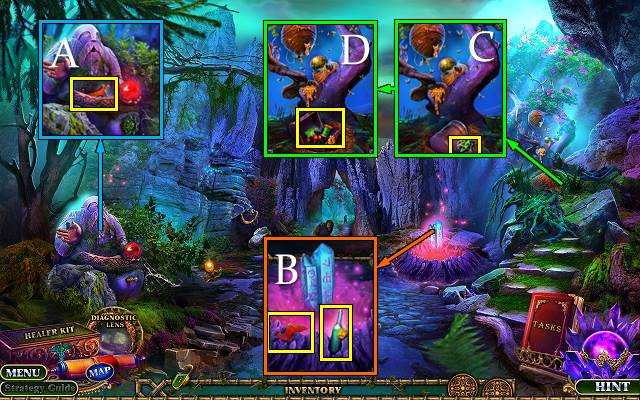
- Go (A).

- Take CACHE TILE 1/2 with TWEEZERS (B).
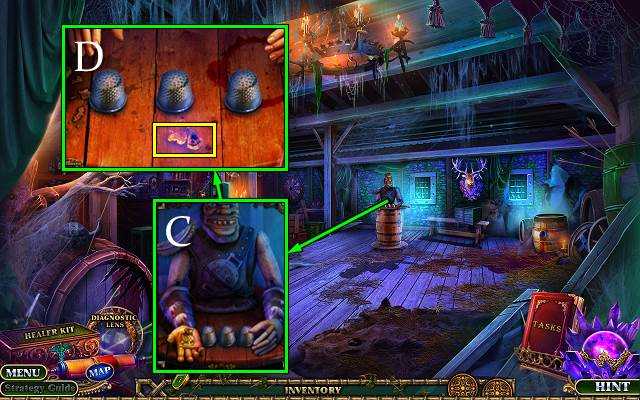
- Take FORK, DUSTER and note (C).
- Use DUSTER; take CACHE TILE 2/2 (D).
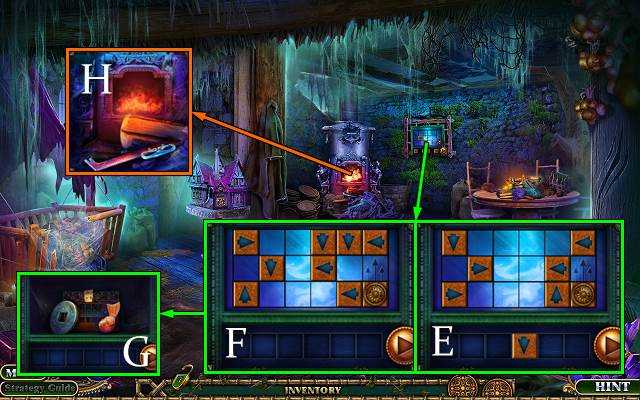
- Place CACHE TILE; easy solution (E).
- Hard solution (F).
- Take GRINDSTONE and BIRD FIGURINES 1/2 (G).
- GRINDSTONE on RUSTY AXE; receive AXE.
- Use AXE; take FLINT and SAW BLADE (H).
- Walk down.
- SAW BLADE on BROKEN HACKSAW; receive HACKSAW.
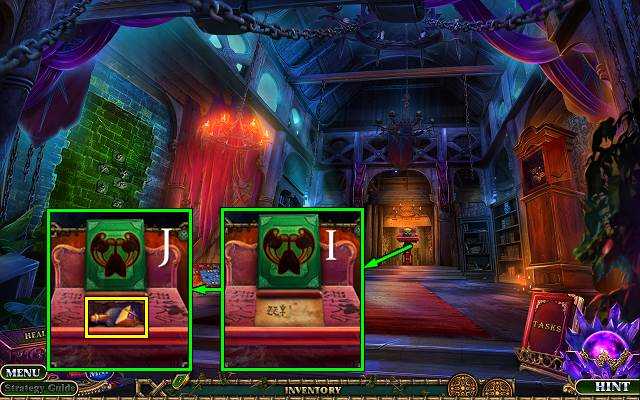
- Use HACKSAW (I).
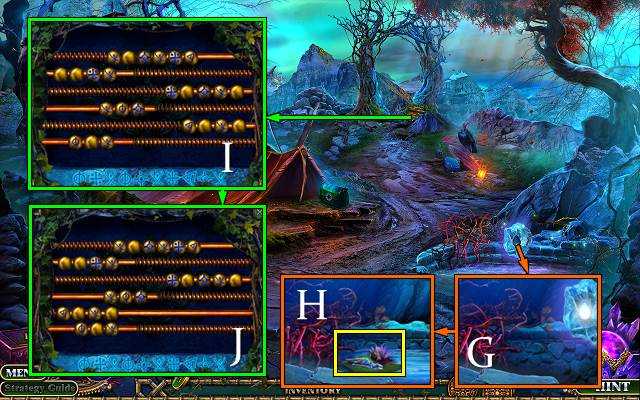
- Play HOP (J); receive KEROSENE.
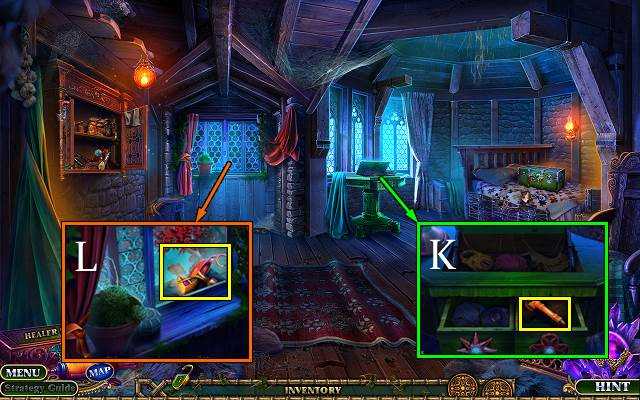
- Use KEROSENE and FLINT. Easy solution(K): 8-2-3-8-5-6-8-7-4-1-7.
- Hard solution (L): 10-3-4-10-2-1-9-8-5-2-8-10-6-7-10-9.
- Go (M).
- Talk (N).
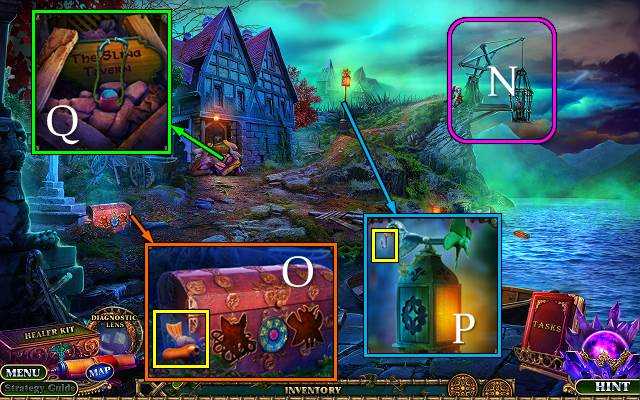
- Take METAL PIN and BIRD FIGURINES 2/2 (O).
- Use LEMON; take HOOK (P).
- Use FORK; take SLING (Q).
- Go to House.
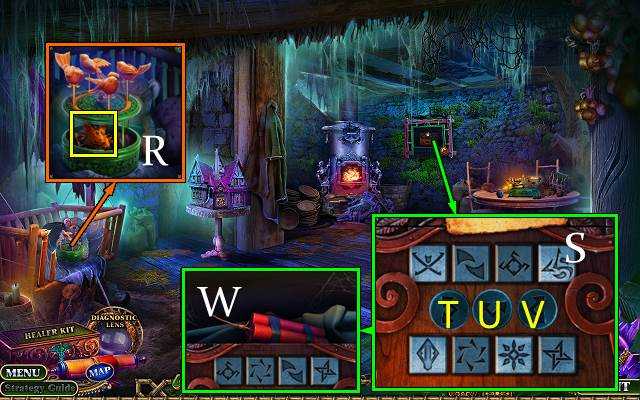
- Place BIRD FIGURINES; take WOODEN INLAY 1/2 and COMBINATION PART (R).
- Place COMBINATION PART (S).
- Easy solution: T-U-Tx2-Vx2.
- Hard solution: U-T-U-Vx3-T-U-V-U-Vx2-Ux2-T.
- Take DYNAMITE (W).
- Go to Pier.
- Use DYNAMITE and FLINT (X).
- Go (Y).
- Take BROKEN FISHING ROD (Z).
- Use SLING (A); receive WOODEN INLAY 2/2.
- Take RIFLE (B).
- Place RIFLE; take WEIGHT 1/2 and LOCKPICK (C).
- Walk down.
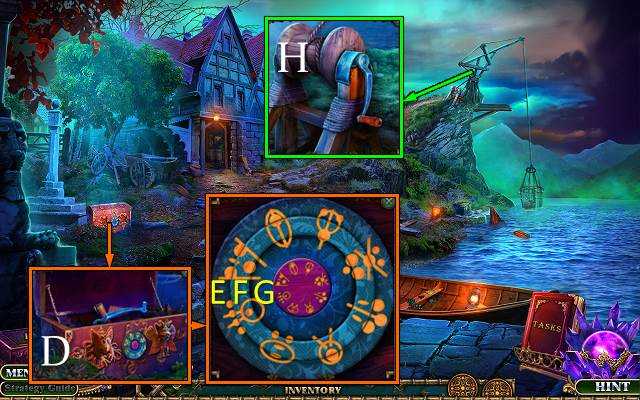
- Place WOODEN INLAY (D).
- Easy solution: Ex6-Fx3-G.
- Hard solution: Fx3-Ex3-G.
- Take CRANK, note and SAFE PART 1/2 (D).
- METAL PIN on CRANK.
- Use CRANK (H).
- Use Diagnostic Lens (I); examine patient (J).
- Receive INGREDIENT LIST.
- Take COIL (K).
- COIL and HOOK on BROKEN FISHING ROD; receive FISHING ROD.
- Use FISHING ROD; take CATNIP and TONGS PART (L).
- Go (M).
- Offer CATNIP; take CANDLE and SHOVEL (N).
- Walk down twice.
- Use SHOVEL; take POTION INGREDIENT 1/5, CORKSCREW and WIRE (O).
- Go (P).
- Use LOCKPICK (Q).
- Play HOP (R); receive WEIGHT 2/2.
- Place WEIGHT; take POTION INGREDIENT 2/5, SAFE PART 2/2 and TONGS PART (S).
- Go to Tavern.
- Use CORKSCREW; take NET, METAL QUILL and POTION INGREDIENT 3/5 (T).
- Place SAFE PART (U).
- Easy solution: Vx2-W-V-W-V.
- Hard solution: Wx2-V-W-V-W-Vx2-Wx2-Vx2.
- Take NUT and POTION INGREDIENT 4/5 (X).
- Walk down twice.

- Combine 2x TONGS PART and NUT; receive TONGS.
- Use TONGS; take GOLDEN INLAY (Y).
- Go left.
- Place GOLDEN INLAY. Light CANDLE; receive LIT CANDLE (Z).
- Use LIT CANDLE (A). Play mini-HOP; receive POUCH OF MONEY.
- Go (B).
- Offer POUCH OF MONEY (C).
- Play random game; take POTION INGREDIENT 5/5 (D).
- POTION INGREDIENT on Healer Kit.
- Solution (E).
- Take HEALING POTION (F).
- Walk down.
- Offer HEALING POTION (G).
- Take COMPASS (H).
- Place COMPASS (I).
Chapter 2: The Infection Source
- Talk; take SICKLE HANDLE (J).
- Use Diagnostic Lens (K); examine patient (L).
- Receive INGREDIENT LIST.
- Take BROKEN SCOOP NET; take SICKLE with SICKLE HANDLE (M).
- NET and WIRE on BROKEN SCOOP NET; receive SCOOP NET.
- Use SICKLE (N). Take POTION INGREDIENT 1/5; take EMPTY JAR with SCOOP NET (O).
- Place EMPTY JAR; catch 10 flies and take JAR OF FIREFLIES, FLY INLAY 1/2 and BROKEN STAFF (P).
- Take UNFINISHED FLUTE (Q).
- Place JAR OF FIREFLIES; take PINS and PARCHMENT (R).
- Place PARCHMENT and METAL QUILL. Use key (S).
- Go (T).
- Take FLY INLAY 2/2 (U).
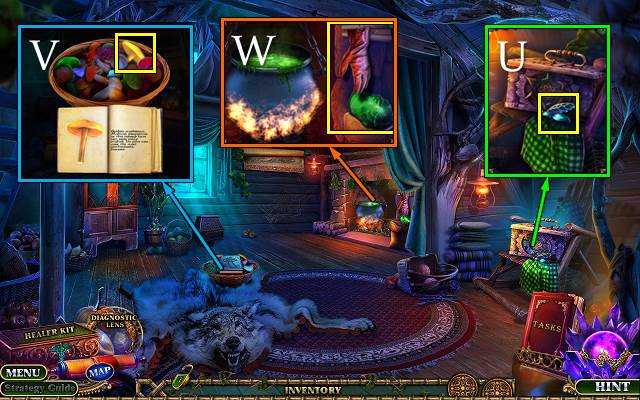
- Find mushrooms in book; take POTION INGREDIENT 2/5 (V).
- Take STAFF PART and GLOVE (W).
- Use PINS (X).
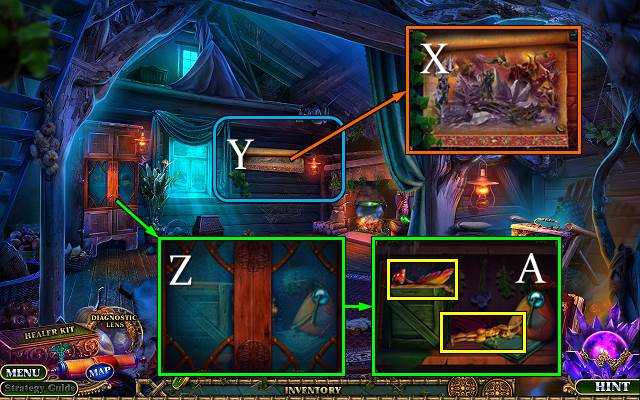
- Play HOP (Y); receive DIAMOND RING.
- Use DIAMOND RING (Z). Move and take ATLAS STATUETTE; take STAFF PART and MUSHROOM (A).
- Walk down.
- Place FLY INLAY (B); take HAND DRILL and CUP (C).
- HAND DRILL on UNFINISHED FLUTE; receive FLUTE.
- Use FLUTE; take POTION INGREDIENT 3/5 (D).
- STAFF PART x2 on BROKEN STAFF; receive MAGIC STAFF.
- Place MAGIC STAFF (E).
- Go (F).
- Use ATLAS STATUETTE; take SCRAPER and HAMMER (G).
- Use GLOVE; take LADLE and NUTCRACKER (H).
- Take POTION INGREDIENT 4/5; use SCRAPER (I). Take DEMON HORN 1/2 (J).
- Take DEMON HORN 2/2 with LADLE (K).
- Place DEMON HORN (L).
- Easy solution: M-O-N.
- Hard solution: M-N-O-N-O-M.
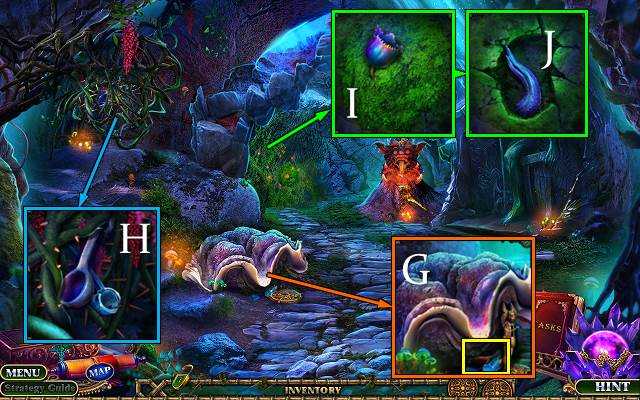
- Take note, CLAW and BROKEN DISC (P).
- Go to Witch’s Hut.
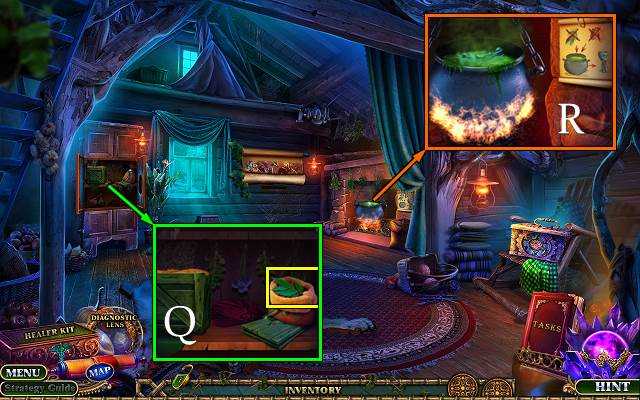
- Use NUTCRACKER; take GREEN TWIG (Q).
- Place MUSHROOM and GREEN TWIG; take POTION INGREDIENT 5/5 with CUP (R).
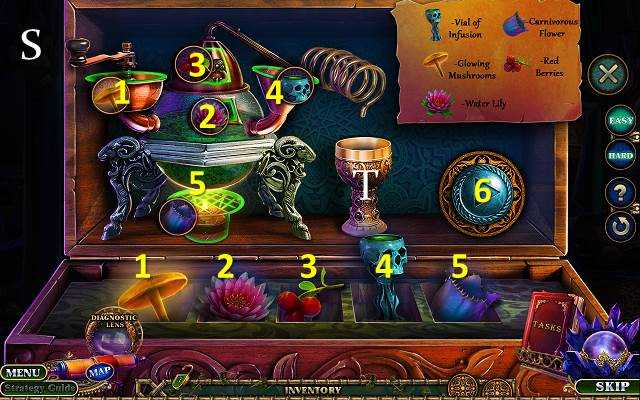
- POTION INGREDIENT on Healer Kit.
- Solution (S).
- Take HEALING POTION (T).
- Walk down.
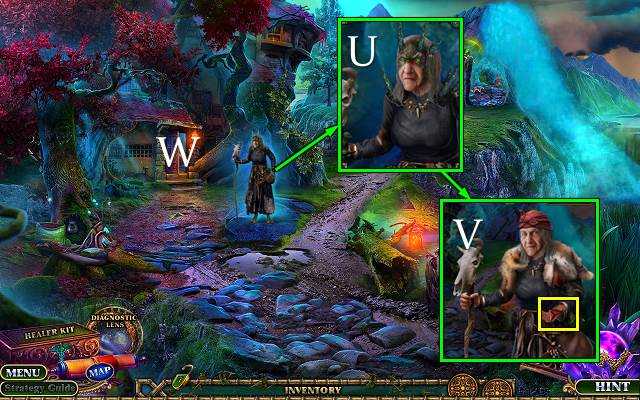
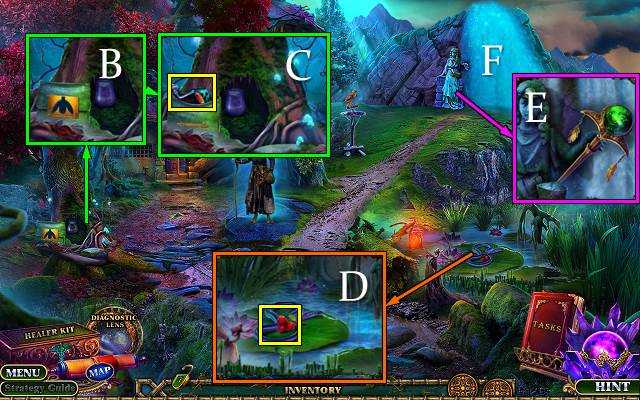
- Offer HEALING POTION (U); take RED ARROW (V).
- Go (W).
- Place RED ARROW (X).
- Solution: Yx2-Zx3-Yx2-A-Yx2-A.
- Take CHISEL and DISC PART (B).
- Go to Mushroom Cave.
- Use CHISEL and HAMMER; take DISC PART, BROOM and AWL (C).
- DISC PART x2 on BROKEN DISC; receive DISC.
- Place DISC (D).
- Easy solution: E-F-G-E-Fx2-Ex2-F-G.
- Hard solution: F-E-Fx2-E-Fx2-E-Gx3-F-Gx3-Fx3-Gx3.
- Take HAWK CRYSTAL RING (H).
- Walk down.
- Place HAWK CRYSTAL RING (I).
- Take CANE; take BRACELET STONE with AWL (J).
- Take note; place BRACELET STONE and take BARRETTE and MACE (K).
- Use MACE (L).
- Go (M).
- Use BROOM; take CLOSED SHELL (N).
- Place CLOSED SHELL (O).
- Easy solution: 1-3-4-5-7-8-1-3-6-5-7-6-4-3-2-1-8.
- Hard solution: 7-5-6-7-8-1-2-3-4-5-6-7-8-2-3-4-5-7-8-1-2-8-7-6-4-3-2-1-8.
- Take PINCERS and AMULET PARTS 1/2 (O).
- Use CANE; take LEVERAGE (P). Open bag and use CLAW; take VALVE and AMULET PARTS 2/2 (Q).
- Walk down.
- Place AMULET PARTS; take DEMON BLOOD (R).
- Go (S).
- Offer DEMON BLOOD (T).
- Play HOP (U); receive LEVER.
- Walk down.
- Place LEVERAGE and LEVER (V).
- Go (W).
- Use Diagnostic Lens (X); examine patient (Y).
- Receive INGREDIENT LIST.
- Receive SHOVEL.
- Use PINCERS; take STATUE PART 1/2 (Z).
- Place VALVE; take HANDLE PART and STATUE PART 2/2 (A).
- Take BROKEN FRETSAW and ACID (B).
- Use SHOVEL; take POTION INGREDIENT 1/5 (C). Use BARRETTE; take POTION INGREDIENT 2/5 and THREAD SPOOL (D).
- Walk down.
- Place STATUE PART; take POTION INGREDIENT 3/5 and CHALK (E).
- Go (F).
- Use CHALK; take SCROLL (G).
- Use ACID; take BROKEN SMOKER and FRETSAW BLADE (H).
- Go to Hillside.
- Use SCROLL (I).
- Easy solution (J).
- Hard solution (K).
- Take DEMONIC AMULET (L).
- HANDLE PART and FRETSAW BLADE on BROKEN FRETSAW; receive FRETSAW.
- Use FRETSAW; take PRISM (M).
- Walk down.
- Place DEMONIC AMULET (N); take PIECE OF LEATHER (O).
- Go right.
- Place PRISM; take CORK and POTION INGREDIENT 4/5 (P).
- Go to Hillside.
- THREAD SPOOL and PIECE OF LEATHER on BROKEN SMOKER; receive BEE SMOKER.
- Use BEE SMOKER; take POTION INGREDIENT 5/5 and ROPE (Q).
- POTION INGREDIENT on Healer Kit.
- Solution (R); take HEALING POTION (S).
- Offer HEALING POTION (T).
- Receive FANG TALISMAN.
- Go (U).
Chapter 3: Littlespring Village
- Use FANG TALISMAN; take SHELL and GAUZE BANDAGE (V).
- Use GAUZE BANDAGE; take MATCHES and BROKEN PRUNERS (W).
- Use ROPE; take STICK WITH RESIN (X).

- Take BROKEN BAST BASKET; offer SHELL (Y). Take SPIRIT (Z).
- Walk down.
- CORK and STICK WITH RESIN on BROKEN BAST BASKET; receive BAST BASKET.
- Take HONEY with BAST BASKET (A).
- Go (B).
- Offer HONEY (C).
- Go (D).
- Take DEAD TORCH and STAFF (E).
- SPIRIT and MATCHES on DEAD TORCH; receive LIT TORCH.
- Use LIT TORCH; take PRUNERS HANDLE, PIKE POLE and WOODEN BOARDS (F).
- Use PIKE POLE (G).
- Play HOP (H); receive BRUSH.
- Use BRUSH; take GRINDSTONE (I).
- PRUNERS HANDLE and GRINDSTONE on BROKEN PRUNERS; receive PRUNERS.
- Use PRUNERS; take EAGLE AMULET and STONE (J).
- Walk down.
- Place EAGLE AMULET; take WOODEN CAGE (K).
- Go forward.
- Offer WOODEN CAGE; take WOODEN SQUIRREL and HOOK (L).
- Place WOODEN SQUIRREL; easy and hard solution (M).
- Take THREAD SPOOL and NAILS (N).
- Stack WOODEN BOARDS; place NAILS and STONE. Receive BRIDGE PART.
- Place BRIDGE PART (O).
- Go (P).
- Use Diagnostic Lens (Q); examine patient (R).
- Receive INGREDIENT LIST.
- Take GLOVE (S).
- Take note and WEIGHT (T).
- Use GLOVE and take POTION INGREDIENT 1/5 and SCISSORS (U).
- Use SCISSORS; receive LEATHER BELT (V).
- Place WEIGHT; take TOY WOODCUTTER (W).
- Walk down twice.
- Place TOY WOODCUTTER (X).
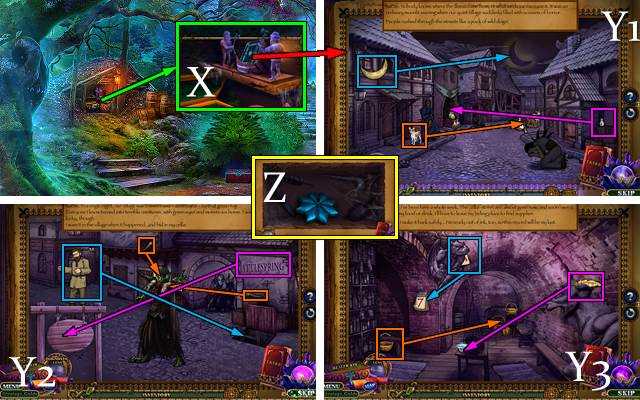
- Solution (Y1-3).
- Take CHEST AMULET (Z).
- Place CHEST AMULET; take POTION INGREDIENT 2/5, ROSE INLAY and ROPE (A).
- Walk down.
- Place STAFF; take BROKEN FISHING ROD (B).
- Go (C).
- ROPE, THREAD SPOOL and HOOK on BROKEN FISHING ROD; receive FISHING ROD.
- Use FISHING ROD; take POTION INGREDIENT 3/5. Play mini-HOP; receive HERBICIDE (D).
- Go (E).
- Place ROSE INLAY; take WIRE and POTION INGREDIENT 4/5 (F).
- Go (G).
- Use HERBICIDE; take NUT and POTION INGREDIENT 5/5 (H).
- POTION INGREDIENT on Healer Kit.
- Solution (I); take HEALING POTION (J).
- Offer HEALING POTION (K); take CARROT (L).
- Offer CARROT (M).
- Go (N).
- Place LEATHER BELT; take FILE and FORCEPS (O).
- Take QUILL; use WIRE (P). Take COIN (Q).
- Use COIN (R).
- Play HOP (S); receive WINDING KEY.
- Take IRON BAR with FILE. Place WINDING KEY; take CHEST FIGURINE (T).
- Place CHEST FIGURINE; take RAG (U).
- Walk down.
- Place IRON BAR, use FORCEPS, use hammer and take CROWBAR (V).
- Use CROWBAR (W).
- Go (X).
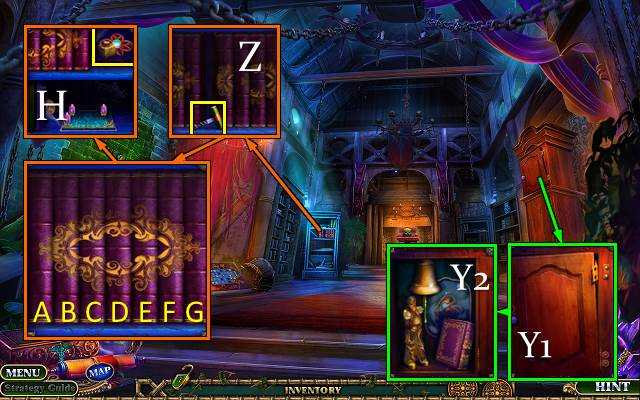
- Place NUT (Y1); take BOOK (Y2).
- Take CORKSCREW; place BOOK (Z).
- Easy solution: C-E-G-D-B-D.
- Hard solution: F-D-C-F-B-A-B-A.
- Take INKWELL and FLOWER INLAY (H).
- CORKSCREW and QUILL on INKWELL; receive INKWELL AND QUILL.
- Place INKWELL AND QUILL (I); take LITTLE ARROW 1/2 and VINEGAR (J).
- Go to Lucas’s House.
- Place FLOWER INLAY; take WINDOW HANDLE (K).
- Place WINDOW HANDLE; take LITTLE ARROW 2/2 and CANDLESTICK (L).
- Go to City Hall.
- Place LITTLE ARROW; easy solution (M).
- Hard solution (N).
- Take STATUE FRAGMENTS 1/2 and SECRET DOOR HINT (O).
- Place SECRET DOOR HINT. Select 1-6 (P).
- Go (Q).
- Use RAG; receive WET RAG. Take CRYSTAL (R).
- Use WET RAG (S); take HAMMER and FLINT AND STEEL (T).
- Use VINEGAR; take CANDLE (U).
- CANDLE and FLINT AND STEEL on CANDLESTICK.
- Place CANDLESTICK; take MAGISTRATE’S STAMP 1/2 and SPEAR (V).
- Walk down.
- Place CRYSTAL; take RING (W).
- Go to Lucas’s House.
- Use HAMMER; take SCOOP and STATUE FRAGMENTS 2/2 (X).
- Go to City Hall.
- Place STATUE FRAGMENTS; take MAGISTRATE’S STAMP 2/2 and CHAIN (Y).
- Place MAGISTRATE’S STAMP (Z); take DISSOLVENT, note and HOOK (A).
- Go (B).
- CHAIN and RING on HOOK; receive HOOK ON CHAIN.
- Place HOOK ON CHAIN (C).
- Play HOP (D); receive PUZZLE PART.
- Place PUZZLE PART (E).
- Easy solution (F): 1-7-6-6-4-2-3-3-3-7-6-6-5-5-5.
- Hard solution (G): 2-8-8-8-2-2-2-8-2-2-8-7-1-2-2-6-6-6-5-5-5.
- Take MAGIC WAND (H).

- Use MAGIC WAND (I).
- Receive DOOR KEY.
- Use DOOR KEY (J).
- Go (K).
Chapter 4: The Island
- Use SPEAR (L); take WOODEN BOARD 1/4 and FILE (M). Use DISSOLVENT; take KNIFE HANDLE (N).
- Take WOODEN BOARD 2/4 (O).
- Use SCOOP; take WOODEN BOARD 3/4 and CHIP WITH A SYMBOL 1/2 (P).
- Place KNIFE HANDLE; take KNIFE and WOODEN BOARD 4/4 (Q).
- Place WOODEN BOARD (R).
- Go (S).
- Take note. Use KNIFE; take PLIERS (T).
- Take MAMMOTH TUSK; take CHIP WITH A SYMBOL 2/2 with PLIERS (U).
- Take STURDY STICK (V).
- Place STURDY STICK; take HANDLE and note (W).
- Walk down.
- Use MAMMOTH TUSK; take AWL and THIN ROD (X).
- Place HANDLE; take HORN (Y).
- Walk down.
- Place CHIP WITH SYMBOL (Z).
- Easy solution: 2-4-7-4-7-7-4-7-7-4-7-7.
- Hard solution: 1-2-4-5-7-4-7-7-2-7-7-7-7-4-7-7-7-7-2-7-7-5-7-7-4-7-7-7-7-4-1-7-7.
- Take SEAL KEY (A).
- Go forward twice.
- Use SEAL KEY; take BOTTLE and take RUNIC BEADS with FILE (B).
- Use HORN; take CRYSTAL (C).
- Walk down.
- Use CRYSTAL; take MAGIC WATER with BOTTLE (D).
- Use MAGIC WATER; take PURIFYING CRYSTAL (E).
- Go (F).
- Place PURIFYING CRYSTAL (G); take DIAMOND RING, NIPPERS and SPRING (H).
- RUNIC BEADS and SPRING on THIN ROD; receive ROD WITH BEADS.
- Place ROD WITH BEADS; easy solution (I).
- Hard solution (J).
- Talk (K).
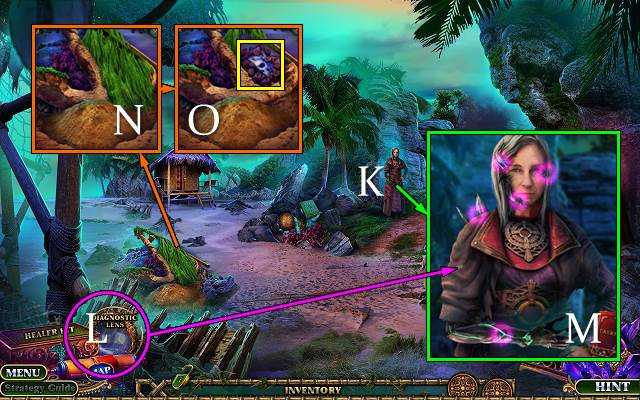
- Use Diagnostic Lens (L); examine patient (M).
- Receive INGREDIENT LIST.
- Receive SCRAPER.
- Take POTION INGREDIENT 1/5 with SCRAPER (N); take SKULL HALF with AWL (O).
- Take POTION INGREDIENT 2/5 and RAG (P).
- Place SKULL HALF (Q).
- Easy and hard solution (R).
- Play HOP (S); receive OILER.

- Use OILER; take POTION INGREDIENT 3/5 and MAGNET (T).
- Use MAGNET (U).
- Go (V).
- Take CHISEL (W).
- Use NIPPERS (X); take GOLDEN INLAY (Y).
- Use DIAMOND RING; take STURDY BOWL (Z).

- Place GOLDEN INLAY (A); take POTION INGREDIENT 4/5 and PUZZLE PART (B).
- Walk down.
- Use STURDY BOWL; take STONE (C).
- Use CHISEL and STONE; take HILT (D).
- Go (E).
- Use HILT (F); take BROKEN SLINGSHOT and MIRROR, use RAG and take PUZZLE PART 2/2 (G).
- Place PUZZLE PART (H).
- Easy and hard solution (I).
- Take STAFF and POTION INGREDIENT 5/5 (J).

- POTION INGREDIENT on Healer Kit.
- Solution (K); take HEALING POTION (L).
- Walk down.
- Offer HEALING POTION (M).
- Receive SPELL DIFFUSER.
- Use SPELL DIFFUSER (N) for random mini-game (O).
- Go (P).
- Use STAFF; take SNAKE INLAY (Q).
- Place MIRROR; take CUBE INLAY 1/4 (R).
- Take RAZOR and GEAR 1/2 (S).
- Use RAZOR; take GEAR 2/2 and SLING (T).
- Place GEAR; take NAILPULLER and CUBE INLAY 2/4 (U).
- Walk down.
- Use NAILPULLER; take MUSHROOM and BRUSH (V).
- Go (W).
- Place SNAKE INLAY; take WINDING KEY (X).
- Go to Ravencrest Village.
- Offer MUSHROOM (Y); take PEBBLE and CUBE INLAY 3/4 (Z).
- SLING and PEBBLE on BROKEN SLINGSHOT; receive SLINGSHOT.
- Use SLINGSHOT; take ROPE and CUBE INLAY 4/4 (A).
- Go to Gatehouse.
- Place CUBE INLAY (B); take DARK AMULET (C).
- Go to Ravencrest Village.
- Place DARK AMULET (D).
- Go (E).
- Use WINDING KEY (F); take LENS (G).
- Use BRUSH (H); play HOP.
- Easy solution (I): (12-1)-(2-5)-(3-9)-(4-8)-(5-8)-(7-8)-(11-8).
- Hard solution (I): (1-12)-(5-2)-(9-3)-(11-4)-(9-7)-(5-7)-(5-11)-(7-1)-(4-8).
- Receive SAND.

- Use SAND; take HAMMER, CHAIN and SCROLL PART 1/2 (J).
- Take RING (K).
- Place CHAIN (L); take CRANK (M).
- Walk down.
- Place LENS; take INCOMPLETE PULLEY (N).
- Place INCOMPLETE PULLEY, ROPE, CRANK and RING; take CHEST KEY and BUCKET (O).
- Go to Gatehouse.
- Use CHEST KEY; take SPEARHEAD and GLASS JAR (P).
- Place SPEARHEAD; take RESIN and SCROLL PART 2/2 (Q).
- Go to Dark Magicians’ Library.
- Place SCROLL PART (R).
- Easy and hard solution (S); take COUNTERSPELL SCROLL.
- Use COUNTERSPELL SCROLL (T).
- Go (U).
Chapter 5: The Heart of the Demon
- Take WOODEN BOARD (V). Use HAMMER; take NUT and take BEETLE in GLASS JAR (W).
- Take LEVER (X).
- Use LEVER; take MAGICAL GLASS (Y).
- Walk down.
- Use MAGICAL GLASS on all words (Z); take DUSTER and FIRE SALAMANDER (A).
- Go (B).
- Use DUSTER; take BRUSH and PICKAXE (C).
- Use FIRE SALAMANDER; take STONE HAND (D).
- RESIN, BRUSH and WOODEN BOARD on BUCKET.
- Place BUCKET; take BUCKET OF WATER (E).
- Use BUCKET OF WATER (F).
- Go (G).
- Use BEETLE. Place STONE HAND; take WEIGHT, CORK and KNOCKER (H).
- Take TEARS 1/4 (I). Place WEIGHT; take SHIELD PART 1/3 (J).
- Take TEARS 2/4; use PICKAXE (K). Take WHEEL (L), place KNOCKER, and take TEARS 3/4 and CUP (M).
- Take TEARS 4/4 (N).
- Walk down.

- Place WHEEL and NUT (O).
- Easy solution: P-Q-Q.
- Hard solution: P.
- Play HOP (R); receive GROUND WORKER’S AMULET.
- Place GROUND WORKER’S AMULET; take SHIELD PART 2/3 (S).
- Walk down.
- Place TEARS; take DISPELLING POTION (T).
- Go to Path of the Cursed.
- Use DISPELLING POTION (U).
- Use Diagnostic Lens (V); examine patient (W).
- Receive INGREDIENT LIST.
- Receive BONE KNIFE.
- Use BONE KNIFE; take POTION INGREDIENT 1/5 and SHIELD PART 3/3 (X).
- Go to Dark Magicians’ Library.

- Place SHIELD PART; take POTION INGREDIENT 2/5 and LENS (Y).
- Go forward twice.
- Place LENS (Z).
- Solution; take HOUSE KEY (A).
- Use HOUSE KEY (B).
- Go (C).
- Remove cloth. Place CORK; take SAW and POTION INGREDIENT 3/5 (D).
- Use SAW; take BOTTLE OF WATER, CURVED INLAY and POTION INGREDIENT 4/5 (E).
- Place CURVED INLAY; take note and BURNER (F).
- Take WRENCH (G).
- Use WRENCH (H); take POTION INGREDIENT 5/5. Take SULFUR with CUP (I).
- POTION INGREDIENT on Healer Kit.
- Solution (J); take HEALING POTION (K).
- Walk down.
- Offer HEALING POTION (L); receive LATCH.
- Go (M).
- Place LATCH (N); take HEAVY BONE and MEAT (O).
- Offer MEAT (P); take HORSE INLAY and FLINT (Q).
- Place HORSE INLAY; take ACTIVATING STONE 1/3 (R).
- Go to Dark Magicians’ Library.
- BURNER, SULFUR and FLINT on BOTTLE OF WATER; receive ACID.
- Use ACID; take CUP OF BLOOD and BLUE TILE 1/2 (S).
- Go to Roven’s Lair.
- Offer CUP OF BLOOD (T).
- Play HOP (U); receive CANDLE.
- Use CANDLE; take BLUE TILE 2/2 (V).
- Walk down.
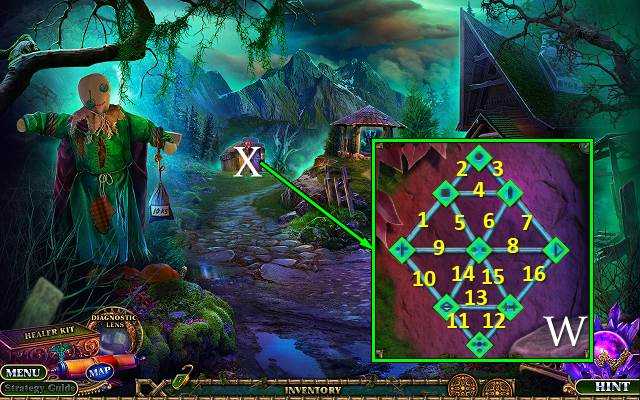
- Place BLUE TILE (W).
- Solution: fill lines 1-16.
- Go (X).
- Use HEAVY BONE; take ACTIVATING STONE 2/3 (Y).
- Take SHIELD and CHIP WITH A SYMBOL 1/4 (Z).
- Place SHIELD; take RAKE and CHIP WITH A SYMBOL 2/4 (A).
- Use RAKE; take ACTIVATING STONE 3/3 and NIPPERS (B).
- Take ARROWHEAD with NIPPERS (C).
- Take CRYSTAL with ARROWHEAD (D).
- Go to Roven’s Lair.
- Use CRYSTAL; take CHIP WITH A SYMBOL 3/4 (E).
- Place ACTIVATING STONE; take CHIP WITH A SYMBOL 4/4 (F).
- Go to Demon Crypt.
- Place CHIP WITH A SYMBOL (G).
- Easy solution (H): select 1-7.
- Hard solution (I): select 1-2-3-2-4-5-4-5-6-7-8.
- Take DEMON’S BANE (J).
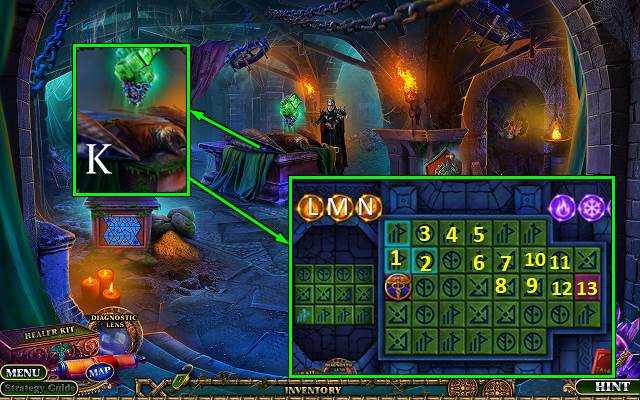
- Use DEMON’S BANE (K).
- Solution: 1-2-3-M-4-5-6-L-7-8-9-10-N-11-12-13.
- Congratulations, you have completed Enchanted Kingdom: Fog of Rivershire.
Some of the contents are from the internet, if these contents infringe on your copyrights, please contact me. All contents doesn't represent my points.